Hi, guys hope you are doing well and I things you all are exiting about the upcoming new year. So in this article, we learn & create a new animated bottom Curved Navigation bar and also implement it into our flutter project. first, we understand what is a Bottom Navigation bar, it contains multiple items such as text labels, icons, or both. it allows the users to navigate between the top-level views of the app quickly.
The bottom navigation bar has become popular over the years for navigation between different UIs. Many developers use bottom navigation as most of the apps are now available using this widget for navigation between different screens. I think now you understand what is the Navigation bar and why we implement it into apps. Now time to create and code part.

Step 1: First we implement a Curved Navigation Bottom Bar package into our project
Open your pubspec.yaml file and add curved_navigation_bar 1.0.3 package and hit the Pub get button.
dependencies:
  curved_navigation_bar: ^1.0.3
Step 2: Open your Main.dart file
Open your Main.dart file and add these codes to your file.
import 'package:flutter/material.dart';
import 'package:flutter/services.dart';
import 'CurvedNavigationBar/curved_navigation_bar.dart';

void main() {
  WidgetsFlutterBinding.ensureInitialized();
  SystemChrome.setEnabledSystemUIMode(SystemUiMode.immersiveSticky, overlays:[]).then(
        (_) => runApp(MyApp()),
  );
 //  runApp(MyApp());
}

class MyApp extends StatelessWidget {

  @override
  Widget build(BuildContext context) {

    return new MaterialApp(
        debugShowCheckedModeBanner: false,
        home:  BottomNavBar(),
    );
  }
}
Step 3: Now create and open your BottomNavBar.dart file
create BottomNavBar.dart file and implement simple code which is contained only Scaffold with appbar
import 'package:flutter/material.dart';


class BottomNavBar extends StatefulWidget {
  @override
  _BottomNavBarState createState() => _BottomNavBarState();
}

class _BottomNavBarState extends State<BottomNavBar> {

  @override
  Widget build(BuildContext context) {
    return Scaffold(
        appBar: AppBar(
          title: Text('Navigation Bar'),
          centerTitle: true,
        ),
        body: Container()
    );
  }
}
Step4: Now you want to create Pages that navigate between to bottom Navigation bar
Create five pages at least to show in the navigation bar like Home, Friends, Shopping, Payment, and Profile.
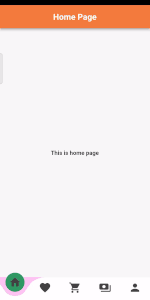
Home.dart
import 'package:flutter/material.dart';

class Home extends StatefulWidget {
  const Home({Key? key}) : super(key: key);

  @override
  State<Home> createState() => _HomeState();
}

class _HomeState extends State<Home> {
  @override
  Widget build(BuildContext context) {
    return Scaffold(
      backgroundColor: Color(0xFFf8f8f9),
      appBar: AppBar(
        title: Text('Home Page',style: TextStyle(fontWeight: FontWeight.bold),),
        centerTitle: true,
        backgroundColor: Color(0xFFf47c3f),
      ),
      body: Center(
        child: Text('This is home page',style: TextStyle(fontWeight: FontWeight.bold),),
      ),
    );
  }
}
Friends.dart
import 'package:flutter/material.dart';

class Friends extends StatefulWidget {
  const Friends({Key? key}) : super(key: key);

  @override
  State<Friends> createState() => _FriendsState();
}

class _FriendsState extends State<Friends> {
  @override
  Widget build(BuildContext context) {
    return Scaffold(
      backgroundColor: Color(0xFFf8f8f9),
      appBar: AppBar(
        title: Text('Friends Page'),
        centerTitle: true,
        backgroundColor: Color(0xFFb40ac2),
      ),
      body: Center(
        child: Text('This is friends page',style: TextStyle(fontWeight: FontWeight.bold),),
      ),
    );
  }
}
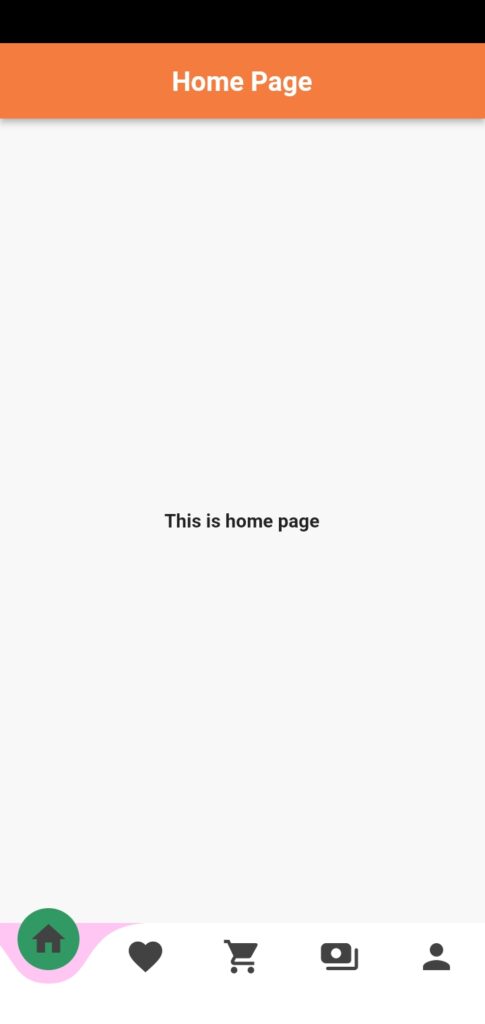
Shopping.dart
import 'package:flutter/material.dart';

class Shopping extends StatefulWidget {
  const Shopping({Key? key}) : super(key: key);

  @override
  State<Shopping> createState() => _ShoppingState();
}

class _ShoppingState extends State<Shopping> {
  @override
  Widget build(BuildContext context) {
    return Scaffold(
      backgroundColor: Color(0xFFf8f8f9),
      appBar: AppBar(
        title: Text('Shopping Page'),
        centerTitle: true,
        backgroundColor: Color(0xFF235fb7),
      ),
      body: Center(
        child: Text('This is shopping page',style: TextStyle(fontWeight: FontWeight.bold),),
      ),
    );
  }
}
Payment.dart
import 'package:flutter/material.dart';

class Payment extends StatelessWidget {
  const Payment({Key? key}) : super(key: key);

  @override
  Widget build(BuildContext context) {
    return Scaffold(
      backgroundColor: Color(0xFFf8f8f9),
      appBar: AppBar(
        title: Text('Payment Page'),
        centerTitle: true,
        backgroundColor: Color(0xFF96c2bb),
      ),
      body: Center(
        child: Text('This is payment page',style: TextStyle(fontWeight: FontWeight.bold),),
      ),
    );
  }
}
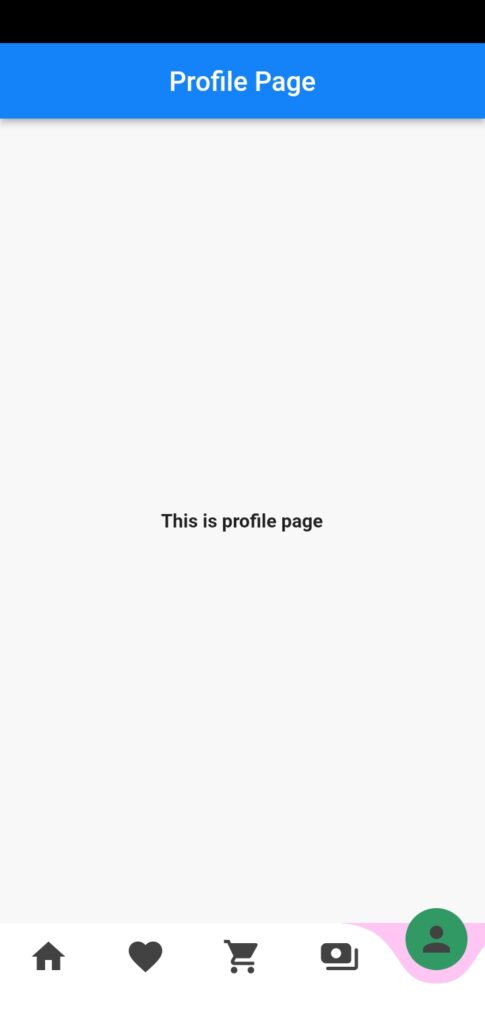
Profile.dart
import 'package:flutter/material.dart';

class Profile extends StatefulWidget {
  const Profile({Key? key}) : super(key: key);

  @override
  State<Profile> createState() => _ProfileState();
}

class _ProfileState extends State<Profile> {
  @override
  Widget build(BuildContext context) {
    return Scaffold(
      backgroundColor: Color(0xFFf8f8f9),
      appBar: AppBar(
        title: Text('Profile Page'),
        centerTitle: true,
        backgroundColor: Color(0xFF1483f9),
      ),
      body: Center(
        child: Text('This is profile page',style: TextStyle(fontWeight: FontWeight.bold),),
      ),
    );
  }
}
Step 5: Now edit your BottomNavBar.dart file
Now open your BottomNavBar.dart file and customize it like this and run.
import 'package:flutter/material.dart';
import 'package:curved_navigation_bar/curved_navigation_bar.dart';
import 'package:navigationdrawer/CurvedNavigationBar/friends.dart';
import 'package:navigationdrawer/CurvedNavigationBar/payment.dart';
import 'package:navigationdrawer/CurvedNavigationBar/profile.dart';
import 'package:navigationdrawer/CurvedNavigationBar/shooping.dart';
import 'home.dart';

class BottomNavBar extends StatefulWidget {
  @override
  _BottomNavBarState createState() => _BottomNavBarState();
}

class _BottomNavBarState extends State<BottomNavBar> {
  int _page = 0;
  GlobalKey<CurvedNavigationBarState> _bottomNavigationKey = GlobalKey();

  final _widgetOptions = [

    Home(),
    Friends(),
    Shopping(),
    Payment(),
    Profile(),

  ];

  @override
  Widget build(BuildContext context) {
    return Scaffold(
        bottomNavigationBar: CurvedNavigationBar(
          key: _bottomNavigationKey,
          index: 0,
          height: 75.0,
          items: <Widget>[
            Icon(Icons.home, size: 30,color: Colors.grey.shade800,),
            Icon(Icons.favorite, size: 30,color: Colors.grey.shade800,),
            Icon(Icons.shopping_cart, size: 30,color: Colors.grey.shade800,),
            Icon(Icons.payments_rounded, size: 30,color: Colors.grey.shade800,),
            Icon(Icons.person, size: 30,color: Colors.grey.shade800,),
          ],
          color: Colors.white,
          buttonBackgroundColor: Color(0xFF319964),
          backgroundColor: Color(0xFFffc5f3),
          animationCurve: Curves.easeInOut,
          animationDuration: Duration(milliseconds: 600),
          onTap: (index) {
            setState(() {
              _page = index;
            });
          },
          letIndexChange: (index) => true,
        ),
        body: Center(
          child: _widgetOptions.elementAt(_page),
        )
    );
  }
}
Output
Conclusion
So in this article, we understand what is Navigation and why we used it in apps. We also learn how to create a Navigation bar, how to implement a Navigation bar into flutter apps, and how to use a curved navigation bar in flutter apps. The navigation bar is very useful when your app is bigger(like many screens and pages) and not possible to adjust to one Home screen.
Thanks for reading this article ❤
If I got something wrong? Let me know in the comments. I would love to improve.
Clap 👏 If this article helps you.
If we got something wrong? Let me know in the comments. we would love to improve.
If you like my work then you also read these articles on How to implement Login Interactive Form with Rive Animation, How to create Toast Notification in a flutter, How to Implementing Navigation Drawer Animation into Flutter.