Hi Gyuz we hope you all are well & good and Dosomthings in your life. So in this article, we understand what Dark Mode or Light Mode in apps is, how to implement Dark Mode, and why we use Dark Mode/Light Mode. we go further first we understand what is Dark Mode & Light Mode.
Dark Mode:
The dark mode is characterized by darker backgrounds and lighter text/icons. It’s designed to reduce the amount of light emitted by screens, which can be beneficial in various scenarios:
- Reduced Eye Strain: Dark mode can be easier on the eyes, especially in low-light environments. The lower brightness of dark backgrounds can help reduce eye strain and visual fatigue.
- Better for OLED Displays: OLED displays can individually turn off pixels to display true black. In dark mode, using black backgrounds can result in energy savings and better contrast.
- Preserving Night Vision: When using devices in the dark, such as during bedtime, the dark mode can help preserve your night vision and make it easier to transition to a dark environment.
- Energy Efficiency: For devices with OLED or AMOLED screens, the dark mode can save battery life since individual pixels can be turned off, using less power.
- Aesthetics: Many users find dark mode visually appealing and modern. It can also reduce the glare of a bright screen, creating a more immersive experience.
Light Mode:
Light mode is the traditional color scheme with light backgrounds and dark text/icons. It offers its own set of advantages:
- Readability: Light mode often provides better readability, especially in well-lit environments. The high contrast between dark text and light backgrounds can make text stand out more clearly.
- Familiarity: Light mode is the default mode in most applications and websites. Users who are accustomed to this mode may find it more comfortable and familiar.
- Accessibility: Light mode is generally more accessible for individuals with certain visual impairments, as the high contrast between text and background can enhance legibility.
- Consistency with Branding: For some apps and websites, the light mode may align better with their branding and design aesthetics, providing a cleaner and more professional look.
The choice between dark mode and light mode often depends on user preference, the context in which the app is used, and the design aesthetics of the application. Some applications even allow users to switch between modes based on the time of day or ambient light conditions.
I think you understand what Dark Mode/Light Mode is and why we use them, so let’s get to the coding part.
Step 1: Create a New Flutter Project: Open your terminal and create a new Flutter project using the following command:
flutter create dark_light_mode_app
Step 2: Implement packages that are used in this project
dependencies:
  flutter:
    sdk: flutter


  # The following adds the Cupertino Icons font to your application.
  # Use with the CupertinoIcons class for iOS style icons.
  cupertino_icons: ^1.0.2
  switcher_button: ^0.0.4
  shared_preferences: ^2.2.0
  provider: ^6.0.5
and placed this code into your pubspec.yaml file and pressed the Pub Get button in the top right corner.
Step 3: Create folders and dart files inside the lib folder like Shared Preferences, Pages, and Theam, and inside these folders, we create the dart files for better understanding and good practice for the projects.
theam_sharred_preferences.dart file:
import 'package:shared_preferences/shared_preferences.dart';

class TheamSharredPreferences{
  static const PREF_KEY = "preferences";

  setTheam(bool value) async{
    SharedPreferences sharedPreferences = await SharedPreferences.getInstance();
    sharedPreferences.setBool(PREF_KEY, value);
  }

  getTheam() async{
    SharedPreferences sharedPreferences = await SharedPreferences.getInstance();
    return sharedPreferences.getBool(PREF_KEY) ?? false;
  }


}
theam_model.dart file:
import 'package:flutter/cupertino.dart';
import 'package:flutter/material.dart';
import 'package:lcs/Sharred%20Preferences/theam_sharred_preferences.dart';

class TheamModal extends ChangeNotifier{
  late bool _isDark;
  late TheamSharredPreferences theamSharredPreferences;
  bool get isDark => _isDark;

  TheamModal(){
    _isDark = false;
    theamSharredPreferences = TheamSharredPreferences();
    getTheamPreferences();

  }

  set isDark(bool value){
    _isDark = value;
    theamSharredPreferences.setTheam(value);
    notifyListeners();
  }

  getTheamPreferences() async{
    _isDark = await theamSharredPreferences.getTheam();
    notifyListeners();
  }

}
homePage.dart file:
import 'package:flutter/material.dart';
import 'package:flutter/cupertino.dart';
import 'package:lcs/Theam/theame_model.dart';
import 'package:provider/provider.dart';
import 'package:switcher_button/switcher_button.dart';
class HomePage extends StatefulWidget {
const HomePage({Key? key}) : super(key: key);
@override
State<HomePage> createState() => _HomePageState();
}
class _HomePageState extends State<HomePage> {
@override
Widget build(BuildContext context) {
return Consumer(
builder: (context, TheamModal theamNotifier,child){
return Scaffold(
appBar: AppBar(
title: Text(theamNotifier.isDark ? "Dark Theam" : "Light Theam"),
),
body: Center(
child: Column(
mainAxisAlignment: MainAxisAlignment.center,
children: [
SwitcherButton(
value: theamNotifier.isDark ? false : true,
onChange: (value){
theamNotifier.isDark
? theamNotifier.isDark = false
: theamNotifier.isDark = true;
},
),
SizedBox(height: 40,),
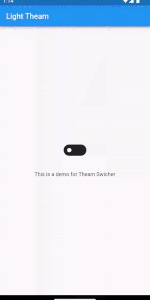
Text("This is a demo for Theam Swicher"),
],
),
),
);
},
);
}
}
And last is main.dart file:
import 'package:flutter/material.dart';
import 'package:lcs/Pages/homePage.dart';
import 'package:lcs/Theam/theame_model.dart';
import 'package:provider/provider.dart';

void main() {
  runApp(const MyApp());
}

class MyApp extends StatelessWidget {
  const MyApp({super.key});

  // This widget is the root of your application.
  @override
  Widget build(BuildContext context) {
    return ChangeNotifierProvider(
      create: (_) => TheamModal(),
      child : Consumer(
        builder: (context,TheamModal theamModal, child){
          return MaterialApp(
            debugShowCheckedModeBanner: false,
            title: "Example For Dark and Light Mode",
            theme: theamModal.isDark ? ThemeData.dark() : ThemeData.light(),
            home: HomePage(),
          );
        },
      )
    );
  }
}
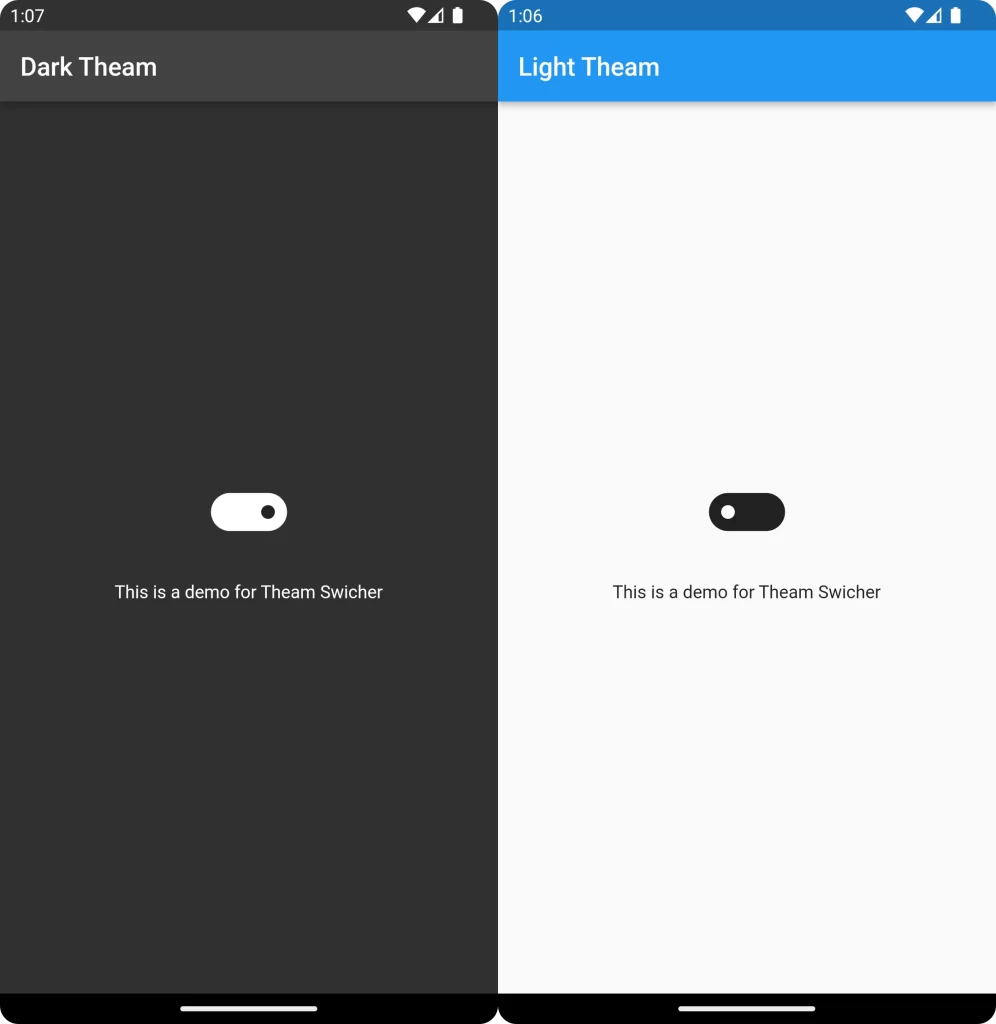
Output:
Conclusion
Incorporating both dark mode and light mode into your Flutter app is an excellent strategy to enhance user satisfaction, accessibility, and versatility. This approach embraces user diversity and recognizes the importance of comfort and aesthetics in modern app design. By understanding the benefits of each mode and tailoring the implementation to your app’s unique identity, you can create an app that caters to users’ needs while maintaining a cutting-edge design ethos.
❤️❤️ Thanks for reading this article, ❤️❤️
If I got something wrong? Let me know in the comments. I would love to improve 🥰🥰🥰.
Clap 👏👏👏 If this article helps you.
if you like our work so please follow us on this Dosomthings
Our New and Attractive articles:
SHA-1 key in Flutter: How to Generate SHA-1 key in Flutter.
Tinder swipe card: How to implement tinder swipe card in a flutter.
Login Page UI in Flutter: How to Build Login Page UI in Flutter.