Hii guys I hope you doing well in your life. So today we learn and implement the Draggable Scrollable sheet into our Flutter project with simple steps. First, we understand what is a DraggableScrollableWidget. DraggableScrollableSheet widget is a draggable and scrollable widget that responds to drag gestures by resizing the scrollable until a limit is reached, and then scrolling. It looks like a sheet that is built in a bottom but actually, it can be dragged and scrolled up to a certain limit. This widget can be dragged along the vertical axis providing a scrolling effect.
DraggableScrollableSheet class is basically a widget that looks like a sheet that drags down from the bottom and expands in a vertical direction. This widget expands up to a certain fraction of a screen in an app as per the limited height provided and then enables a scrolling effect inside its expanded height. It can be said that it is a bottom appbar that expands its size and contains a list of data inside it that scrolls. So I think you understand what is a Draggable Widget, now we come to the coding part.
Sample
import 'package:flutter/material.dart';

class DraggableScrollableSheetPage extends StatefulWidget {
  const DraggableScrollableSheetPage({Key? key}) : super(key: key);

  @override
  State<DraggableScrollableSheetPage> createState() => _DraggableScrollableSheetPageState();
}

class _DraggableScrollableSheetPageState extends State<DraggableScrollableSheetPage> {
  @override
  Widget build(BuildContext context) {
    return Scaffold(
      appBar: AppBar(
        title: Text('DraggableScrollableSheet'),
        centerTitle: true,
      ),
      body: SizedBox.expand(
        child: DraggableScrollableSheet(
          builder: (context, scrollController) {
            return Container(
              color: Colors.blue[100],
              child: ListView.builder(
                  controller: scrollController,
                  itemCount: 30,
                  itemBuilder: (context, index) {
                    return ListTile(
                      title: Text('Item $index'),
                    );
                  },
              ),
              );

          }),
        ),
      );

  }
}
Now let’s create one stylish UI and try to explore more of its properties like:
- initialChildSize: This field specifies the initial size of the bottom draggable sheet you want to appear on the fraction of the screen and takes a double value. Its default value is 0.5. Its value range from 0 – 1.0.
- minChildSize: This field specifies the minimum size of the DraggableScrollableSheet widget that is when any user will scroll down to close the widget, the minimum height will appear. Its default value is 0.25 and ranges from 0 – 1.0. It also specifies the fraction of the screen to be occupied.
- maxChildSize: This field specifies the maximum size of the DraggableScrollableSheet widget that is when any user will scroll up to open the widget, the maximum height will appear. Its default value is 1.0 and ranges from 0 – 1.0. It also specifies the fraction of the screen to be occupied.
- builder: This function returns a widget. Here we will use a ListView and display the details of the animal tapped. By default, we will display the details of the first animal.
- expand: This field specifies whether the widget should expand to fill the available space in its parent or not. The default value is true. We have not specified because we want it to be true.
Now time to Implement Draggable Scrollable Sheet into the Flutter project
import 'package:flutter/material.dart';

class DraggableScrollableSheetPage extends StatefulWidget {
  const DraggableScrollableSheetPage({Key? key}) : super(key: key);

  @override
  State<DraggableScrollableSheetPage> createState() => _DraggableScrollableSheetPageState();
}

class _DraggableScrollableSheetPageState extends State<DraggableScrollableSheetPage> {
  @override
  Widget build(BuildContext context) {
    return Scaffold(
      appBar: AppBar(
        title: Text('DraggableScrollableSheet'),
        centerTitle: true,
      ),
      body: Stack(
        children: [
          Image.network('https://www.shutterstock.com/image-photo/hummus-ingredients-chickpea-tahini-olive-260nw-512000413.jpg',
          fit: BoxFit.cover,
            width: double.infinity,
          ),
          DraggableScrollableSheet(
            initialChildSize: 0.6,
              minChildSize: 0.15,
              maxChildSize: 0.9,
              builder: (context, scrollController) {
                return Padding(
                  padding: EdgeInsets.all(10.0),
                  child:   Container(
                  //  color: Colors.blue[100],
                    child: ListView.builder(
                      controller: scrollController,
                      itemCount: 17,
                      itemBuilder: (context, index) {
                        return ListTile(
                          leading: CircleAvatar(
                            backgroundImage: AssetImage('assets/DraggableImages/draggle${index+1}.jpg'),
                          ),
                          title: Text('Receipe${index+1}'),
                          trailing: Icon(Icons.add),
                        );
                      }
                    ),
                    decoration: BoxDecoration(
                      color: Color(0xFFFA8072),
                      borderRadius: BorderRadius.circular(15),
                    ),
                  ),
                );


              }),
        ],
      )


      );

  }
}
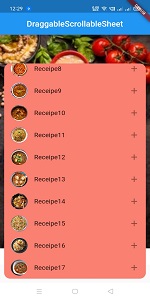
Output

Thanks for reading this article ❤
If I got something wrong? Let me know in the comments. I would love to improve.
Clap 👏 If this article helps you.
If we got something wrong? Let me know in the comments. we would love to improve.
Or if you like our Content then you also read this: How to implement Riverpod State Management into Flutter, how to implement an alert dialog box in a flutter, How to implement Lottie Animation in the flutter project.