Hi guys we hope you all are doing well and create somthings new i your life. So in this article we learn and create a simple and attractive App Rating functionality into our app. the App Rating functionality is important to know user feedback, user satisfactions, UI & UX, and many more because user feedback is increasing your listing into Playstore.
Adding an app rating feature to your app can bring several benefits, both for the app developers and the users. Here are some of the key advantages:
- User feedback and insights: App ratings allow users to express their opinions and provide feedback on their experience with the app. This feedback can be invaluable for developers to understand what users like or dislike about the app, identify areas for improvement, and gather ideas for new features.
- App visibility and credibility: High app ratings and positive reviews can boost your app’s visibility in the app stores. Apps with higher ratings are more likely to be featured, recommended, and ranked higher in search results. Additionally, positive ratings can increase the credibility of your app, encouraging more users to download and try it.
- User acquisition and retention: Positive ratings and reviews can serve as social proof, convincing potential users that your app is worth trying. This can lead to higher user acquisition rates. Furthermore, when users see that other people are satisfied with the app, they are more likely to stay engaged and keep using it.
- App store optimization (ASO): App ratings and reviews are important factors considered by app stores in their ranking algorithms. Higher ratings can positively impact your app’s ASO efforts, leading to increased organic traffic and downloads.

Step 1: Create a new Flutter project (if you don’t already have one)
If you don’t have a Flutter project, create one using the following command in your terminal or command prompt:
flutter create your_project_name
cd your_project_name
Step 2: Open the project in your preferred code editor
Open your newly created Flutter project in your code editor. You can use editors like Visual Studio Code, Android Studio, or IntelliJ IDEA. i am using Android Studio.
Step 3: Update pubspec.yaml
The pubspec.yaml file is where you declare the dependencies for your Flutter project. Open the pubspec.yaml file and add the rating_dialog dependency to it.
dependencies:
  flutter:
    sdk: flutter
  rating_dialog: ^2.0.4
  url_launcher: ^6.1.12
Make sure you indent properly as YAML is sensitive to indentation.
Step 4: Save the file and run flutter pub get
After adding the dependency in the pubspec.yaml file, save the changes, and in your terminal or command prompt, run:
flutter pub getThis command will fetch and download the rating_dialog package along with its dependencies.
Step 5: Import the rating_dialog & url_launcher package in your Flutter app
n the Dart files where you want to use the rating_dialog, url_launcher import it at the top:
import 'package:rating_dialog/rating_dialog.dart';
import 'package:rating_dialog/rating_dialog.dart';
Step 6: Use the rating_dialog in your code
Now, you can use the RatingDialog widget to show the rating dialog in your app. For example, let’s show the rating dialog when a button is pressed:
import 'package:flutter/material.dart';
import 'package:rating_dialog/rating_dialog.dart';
import 'package:url_launcher/url_launcher.dart';

final String url = "http://play.google.com/store/apps/details?id=";
final String packageName = "com.rateuse";

void main() {
  runApp(const App());
}

class App extends StatefulWidget {
  const App({super.key});

  @override
  State<App> createState() => _AppState();
}

class _AppState extends State<App> {

  @override
  Widget build(BuildContext context) {


    return MaterialApp(
      title: "App Rating",
      home: RateUs(),
    );
  }
}

class RateUs extends StatefulWidget {
  const RateUs({Key? key}) : super(key: key);

  @override
  State<RateUs> createState() => _RateUsState();
}


class _RateUsState extends State<RateUs> {


  final _dialog = RatingDialog(
    initialRating: 1.0,
    // your app's name?
    title: Text(
      'Rating Dialog',
      textAlign: TextAlign.center,
      style: const TextStyle(
        fontSize: 25,
        fontWeight: FontWeight.bold,
      ),
    ),
    // encourage your user to leave a high rating?
    message: Text(
      'Tap a star to set your rating. Add more description here if you want.',
      textAlign: TextAlign.center,
      style: const TextStyle(fontSize: 15),
    ),
    // your app's logo?
    image:  const FlutterLogo(size: 100),
    submitButtonText: 'Submit',
    commentHint: 'Set your custom comment hint',
    onCancelled: () => print('cancelled'),
    onSubmitted: (response) {
      print('rating: ${response.rating}, comment: ${response.comment}');

      // TODO: add your own logic
      if (response.rating < 3.0) {
        // send their comments to your email or anywhere you wish
        // ask the user to contact you instead of leaving a bad review
      } else {
        _launchUrl();
      }
    },
  );

  @override
  Widget build(BuildContext context) {
    return WillPopScope(
      onWillPop: () async => false,
      child: Scaffold(
        appBar: AppBar(
          backgroundColor: Color(0xFFe91e63),
          title: Text('Rate Us',style: TextStyle(fontSize: 18,color: Colors.white,fontWeight: FontWeight.bold),),
          centerTitle: true,
        ),
        body: Center(
            child:  DecoratedBox(
                decoration: BoxDecoration(
                    gradient: LinearGradient(colors: [
                      Color(0xFFFF800B),
                      Colors.redAccent,
                      Color(0xFFCE1010),
                      //add more colors
                    ]),
                    borderRadius: BorderRadius.circular(5),
                    boxShadow: <BoxShadow>[
                      BoxShadow(
                          color: Color.fromRGBO(0, 0, 0, 0.57), //shadow for button
                          blurRadius: 5) //blur radius of shadow
                    ]
                ),
                child:ElevatedButton(
                    style: ElevatedButton.styleFrom(
                      primary: Colors.transparent,
                      onSurface: Colors.transparent,
                      shadowColor: Colors.transparent,
                      //make color or elevated button transparent
                    ),
                    onPressed: (){
                      showDialog(
                        context: context,
                        barrierDismissible: true, // set to false if you want to force a rating
                        builder: (context) => _dialog,
                      );
                    },
                    child: Padding(
                      padding:EdgeInsets.only(
                        top: 5,
                        bottom: 5,
                      ),
                      child:Text("Give Us Rating",style: TextStyle(color: Colors.white),),
                    )
                )
            )
        ),
      ),
    );
  }

}


Future _launchUrl() async {
  final Uri _url = Uri.parse(url+packageName);
  if (!await launchUrl(_url)) {
    throw Exception('Could not launch $_url');
  }
}
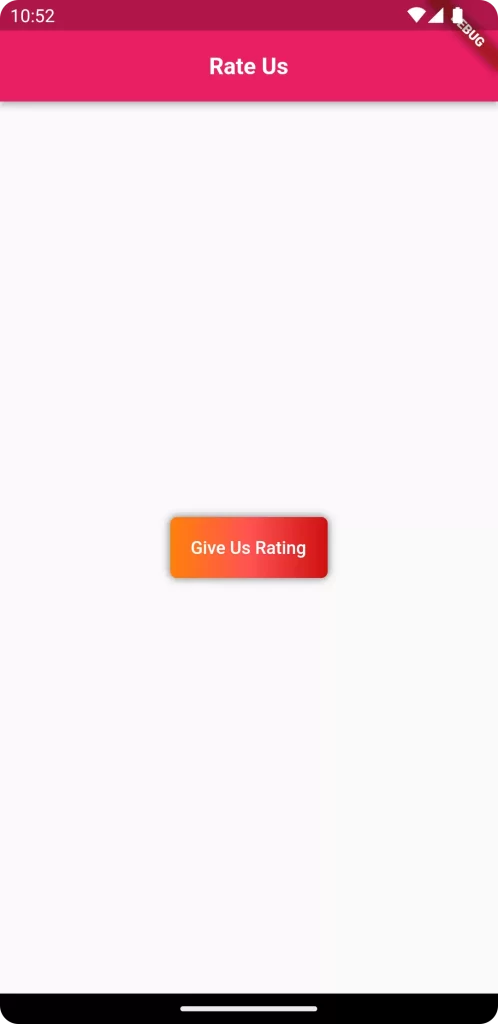
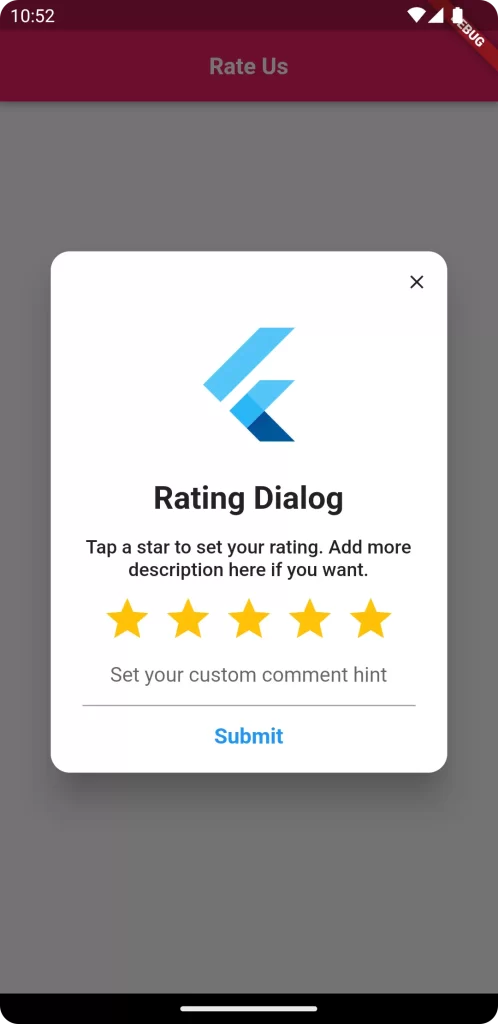
OutPut
The function __launchUrl() is open a play store page where your app located.
String url : url string store the path of play store.
String packageName : this atring basically stroe your applicationId you get into your app/build.gradle file.
This example shows a simple Flutter app with a button. When the button is pressed, it shows the rating dialog using the RatingDialog widget from the rating_dialog package.
Conclusion:
In conclusion, by following the steps above, you have successfully added the “rating_dialog” package version 2.0.4 to your Flutter app. You can now use the RatingDialog widget to show a rating dialog and gather user feedback or ratings for your app. Remember to stay up-to-date with the package documentation and updates to utilize any new features or improvements that might have been introduced in newer versions.
❤️❤️ Thanks for reading this article ❤️❤️
If I got something wrong? Let me know in the comments. I would love to improve 🥰🥰🥰.
Clap 👏👏👏 If this article helps you.
if you like our work so please follow us on this Dosomthings
Our New and Attractive articles:
Save image to file in Flutter: How to download and save image to file in Flutter
Tinder swipe card: How to implement tinder swipe card in a flutter.
Difference Between Two DateTime : How to Get Difference Between Two DateTime in Flutter.