“Have you ever wondered what it takes to completely transform your daily routine into a powerhouse of productivity and joy?”
hello guys, I hope you all are doing well. So right now, we are learning and creating Pul to Refresh in Flutter. first, we understand what a pull to refresh and why we use it in our application. Now we understand what a Pull refresh is.

Pull Refresh
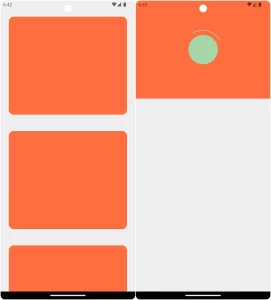
To refresh, pull. A common UX paradigm in mobile applications is Flutter, which lets users manually reload the content of a scrollable screen. Users may easily update the data shown without switching screens or using a separate refresh button, thanks to the pattern.
So don’t westing your time; we’re implementing Pull to refresh step-by-step.
Step 1: Open your project and implement one package, liquid_pull_to_refresh 3.0.1
Open your project terminal and paste this command
flutter pub add liquid_pull_to_refreshStep 2: Open your main.dart file and navigate to your home page In my case, we navigate to HomePage.dart file
import 'package:flutter/material.dart';
import 'package:forarticles/Pages/HomePage.dart';

void main() {
  runApp(const MyApp());
}

class MyApp extends StatelessWidget {
  const MyApp({super.key});

  // This widget is the root of your application.
  @override
  Widget build(BuildContext context) {
    return MaterialApp(
      debugShowCheckedModeBanner: false,
      title: 'Flutter Demo',
      theme: ThemeData(
        colorScheme: ColorScheme.fromSeed(seedColor: Colors.deepPurple),
        useMaterial3: true,
      ),
      home:  HomePage(),
      //   home:  OnBordingScreen(),
    );
  }
}
Step 3: Create new dart file and name it HomePage.dart and paste this code
import 'package:flutter/material.dart';
import 'package:liquid_pull_to_refresh/liquid_pull_to_refresh.dart';

class HomePage extends StatefulWidget {
  const HomePage({Key? key}) : super(key: key);

  @override
  State<HomePage> createState() => _HomePageState();
}


Future<void> _handelRefresh() async{
  return await Future.delayed(Duration(seconds: 2));
}

class _HomePageState extends State<HomePage> {
  @override
  Widget build(BuildContext context) {
    return Scaffold(
      backgroundColor: Colors.grey[200],
      body: LiquidPullToRefresh(
        onRefresh: _handelRefresh,
        color: Colors.deepOrangeAccent,
        height: 300,
        backgroundColor: Colors.green[200],
        animSpeedFactor: 2,
        child: ListView(
          children: [

            Padding(
              padding: const EdgeInsets.all(25.0),
              child: ClipRRect(
                borderRadius: BorderRadius.circular(15),
                child: Container(
                  height: 300,
                  color: Colors.deepOrangeAccent,
                ),
              ),
            ),

            Padding(
              padding: const EdgeInsets.all(25.0),
              child: ClipRRect(
                borderRadius: BorderRadius.circular(15),
                child: Container(
                  height: 300,
                  color: Colors.deepOrangeAccent,
                ),
              ),
            ),

            Padding(
              padding: const EdgeInsets.all(25.0),
              child: ClipRRect(
                borderRadius: BorderRadius.circular(15),
                child: Container(
                  height: 300,
                  color: Colors.deepOrangeAccent,
                ),
              ),
            ),

            Padding(
              padding: const EdgeInsets.all(25.0),
              child: ClipRRect(
                borderRadius: BorderRadius.circular(15),
                child: Container(
                  height: 300,
                  color: Colors.deepOrangeAccent,
                ),
              ),
            ),

          ],
        ),
      ),
    );
  }

}
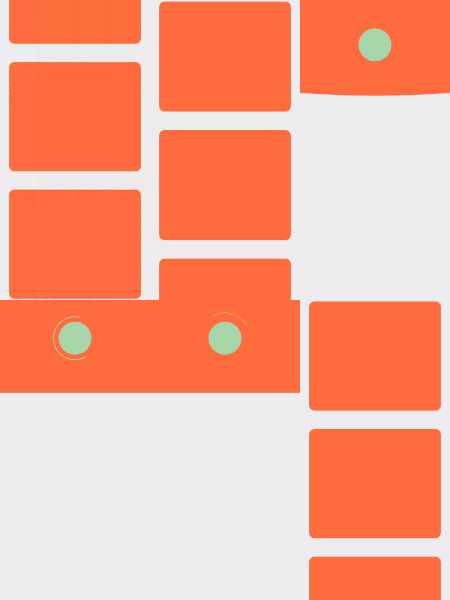
OutPut

Note: You customize this code into your project demand. We give some ideas, like:
- You add one line to hide or show the ListView widget.
showChildOpacityTransition: true,2. you change the color code or _handelRefresh method and change the delay time.
3. You can also change the ListView static data to dynamic data from a database (mysql, firebase, etc.).
Conclusion:
Finally, by utilizing the RefreshIndicator widget to implement the pull-to-refresh Flutter capability, users may easily and naturally change the material that is presented. Here are the main things to keep in mind with Flutter’s pull-to-refresh feature:
- Pull to refresh Flutter is a user interface pattern used in mobile apps to manually refresh the content displayed in a scrollable view.
- Flutter provides the RefreshIndicator widget, which offers built-in functionality and visual indicators for implementing pull-to-refresh. but in this time we use liquid_pull_to_refresh to easy and reduce the time.
- By wrapping a scrollable widget, such as ListView or GridView, with the RefreshIndicator, users can trigger a refresh action by pulling down on the screen.
- During the refresh action, you can implement custom logic, such as fetching new data, updating the UI, or performing other tasks asynchronously.
❤️❤️ Thanks for reading this article ❤️❤️
If I got something wrong? Let me know in the comments. I would love to improve 🥰🥰🥰.
Clap 👏👏👏 If this article helps you,
if you like our work, please follow us on this Dosomthings
Our more attractive articles:
Introduction Screens: E-Commerce App UI in Flutter | EP.01 Introduction Screens.
tinder swipe card: How to implement tinder swipe card in a flutter.
scratch card: How to create scratch card in flutter using a scratcher package.


