Hi guys we hope you all are well & create somethings new, So in this article we learn and create What is the text field for email validation? and How do I validate an email input field? and How do I add email validation to textfield in Flutter? So don’t waste your time let’s go coding part.

TextFormField is commonly used in routine website development when creating forms that require user input. Here are some examples of how TextFormField can be used in typical website scenarios like Email login, user Registration, Login Page, Contact form, Search box, Feedback form, Address and Payment forms, Comment section, and User profile form.
TextFormField is a widget in the Flutter framework, which is a popular open-source UI software development toolkit created by Google. It is used to create a text input field in a Flutter application. This widget is specifically designed to work within a Form widget, allowing you to gather input from the user through text fields.
there is an example where we use <strong>TextFormField</strong>
- Usage within a Form.
- Properties and Validation.
- Text Input Types.
- Events and Focus.
Nowadays every website and app registration without email is incomplete and the user submitted a correct or standard manner email so we first check your submitted correct email ID. So we have two types check whether the email is correct or not and the user prevent from login in without submitting the correct email ID.
there is a two methods for implementing this functionality:
- You can use regex for this.
- You can use emal_validator packages.
1. Use regex for this:
Step 1: Create Simple TextFormField:
Form(
  autovalidateMode: AutovalidateMode.always,
  child: TextFormField(
    validator: validateEmail,
  ),
)
in the validator we use validateEmail String. and we create in the next step.
Step 2 : Create validateEmail String:
String? validateEmail(String? value) {
  const pattern = r"(?:[a-z0-9!#$%&'*+/=?^_`{|}~-]+(?:\.[a-z0-9!#$%&'"
      r'*+/=?^_`{|}~-]+)*|"(?:[\x01-\x08\x0b\x0c\x0e-\x1f\x21\x23-\x5b\x5d-'
      r'\x7f]|\\[\x01-\x09\x0b\x0c\x0e-\x7f])*")@(?:(?:[a-z0-9](?:[a-z0-9-]*'
      r'[a-z0-9])?\.)+[a-z0-9](?:[a-z0-9-]*[a-z0-9])?|\[(?:(?:(2(5[0-5]|[0-4]'
      r'[0-9])|1[0-9][0-9]|[1-9]?[0-9]))\.){3}(?:(2(5[0-5]|[0-4][0-9])|1[0-9]'
      r'[0-9]|[1-9]?[0-9])|[a-z0-9-]*[a-z0-9]:(?:[\x01-\x08\x0b\x0c\x0e-\x1f\'
      r'x21-\x5a\x53-\x7f]|\\[\x01-\x09\x0b\x0c\x0e-\x7f])+)\])';
  final regex = RegExp(pattern);

  return value!.isNotEmpty && !regex.hasMatch(value)
      ? 'Enter a valid email address'
      : null;
}
In this string get the user given value and filter the pattern and return the value email address correct or not.
Full in the bellow
import 'package:flutter/material.dart';
import 'package:flutter/services.dart';
import 'package:google_fonts/google_fonts.dart';
import 'HomePage.dart';

void main() {
  runApp(const App());
}

class App extends StatelessWidget {
  const App({super.key});

  @override
  Widget build(BuildContext context) {
    return MaterialApp(
      title: 'Email Validation',
      home: MainScreen(),
    );
  }
}

class MainScreen extends StatefulWidget {

  @override
  State<MainScreen> createState() => _MainScreenState();
}

class _MainScreenState extends State<MainScreen> {
  final formKey = GlobalKey<FormState>();

  final emailControler = TextEditingController();

  Color btnbackgroundColor = Colors.grey.shade300;

  Color btnTextColor = Colors.black26;

  Color emailBorderColor = Colors.grey.shade300;

  bool _sendUpdates = false;

  bool btnVisible = false;

  @override
  Widget build(BuildContext context) {

    String? validateEmail(String? value) {
      const pattern = r"(?:[a-z0-9!#$%&'*+/=?^_`{|}~-]+(?:\.[a-z0-9!#$%&'"
          r'*+/=?^_`{|}~-]+)*|"(?:[\x01-\x08\x0b\x0c\x0e-\x1f\x21\x23-\x5b\x5d-'
          r'\x7f]|\\[\x01-\x09\x0b\x0c\x0e-\x7f])*")@(?:(?:[a-z0-9](?:[a-z0-9-]*'
          r'[a-z0-9])?\.)+[a-z0-9](?:[a-z0-9-]*[a-z0-9])?|\[(?:(?:(2(5[0-5]|[0-4]'
          r'[0-9])|1[0-9][0-9]|[1-9]?[0-9]))\.){3}(?:(2(5[0-5]|[0-4][0-9])|1[0-9]'
          r'[0-9]|[1-9]?[0-9])|[a-z0-9-]*[a-z0-9]:(?:[\x01-\x08\x0b\x0c\x0e-\x1f\'
          r'x21-\x5a\x53-\x7f]|\\[\x01-\x09\x0b\x0c\x0e-\x7f])+)\])';
      final regex = RegExp(pattern);

      return value!.isEmpty || !regex.hasMatch(value)
          ? 'Enter a valid email address'
          : null;
    }

    return Scaffold(
      backgroundColor: Colors.white,
      body: SingleChildScrollView(
        child: SafeArea(
          child: Container(
            child: Padding(
              padding:  EdgeInsets.all(20),
              child: Column(
                mainAxisAlignment: MainAxisAlignment.spaceBetween,
                crossAxisAlignment: CrossAxisAlignment.start,
                children: [

                  GestureDetector(
                      onTap: (){
                      //  Navigator.of(context).pop();   if you want user go to back...
                      },
                      child: Icon(Icons.arrow_back,size: 30,color: Color(0xFFE91e63),)),

                  SizedBox(
                    height: 20,
                  ),

                  Padding(
                    padding: const EdgeInsets.all(8.0),
                    child: Text(
                      "What's your email",
                      textAlign: TextAlign.center,
                      style: GoogleFonts.roboto(
                        textStyle: TextStyle(
                            fontSize: 30,
                            fontWeight: FontWeight.bold,
                            color: Colors.black,
                            decoration: TextDecoration.none
                        ),
                      ),
                    ),
                  ),

                  SizedBox(height: 30,),

                  Form(
                    key: formKey,
                    child:  Padding(
                      padding: EdgeInsets.only(left: 10,right: 10),
                      child: TextFormField(
                        inputFormatters: <TextInputFormatter>[
                          FilteringTextInputFormatter.allow(RegExp("[0-9@a-zA-Z.]")),
                        ],
                        autocorrect: false,
                        autovalidateMode: AutovalidateMode.onUserInteraction,
                        controller: emailControler,
                        decoration: InputDecoration(
                          suffixIcon: IconButton(
                            icon: Icon(Icons.close,color: Colors.grey,size: 18,),
                            onPressed: () => emailControler.clear(),
                          ),
                          enabledBorder: OutlineInputBorder(
                            borderRadius: BorderRadius.circular(20.0),
                          ),
                          hintText: 'Email',
                          hintStyle: TextStyle(fontSize: 16,color:Colors.black45),
                          fillColor: Colors.grey.shade200,
                          filled: true,
                          counterText: "",
                          focusedBorder:OutlineInputBorder(
                            borderSide: BorderSide(color: emailBorderColor, width: 1.0),
                            borderRadius: BorderRadius.circular(20.0),
                          ),
                        ),
                        keyboardType: TextInputType.emailAddress,
                        textInputAction: TextInputAction.done,
                        validator: validateEmail,
                        onChanged: (value){

                          setState(() {

                            if(validateEmail(value) == null){
                              emailBorderColor = Color(0xFFE91e63);

                            }
                            else{
                              emailBorderColor = Colors.grey.shade300;
                            }

                          });
                        },


                      ),
                    ),


                  ),

                  SizedBox(height: 20,),

                  CheckboxListTile(
                    title: Text("I don't want to get news, good deals and gift from Taxi Rider.", style: GoogleFonts.roboto(textStyle: TextStyle(fontSize: 18, color: Colors.black, fontWeight: FontWeight.w500, decoration: TextDecoration.none),)),
                    activeColor: Colors.white,
                    checkColor: Color(0xFFE91e63),
                    enabled: true,
                    autofocus: false,
                    selected: _sendUpdates,
                    value: _sendUpdates,
                    onChanged: (bool? value) {
                      setState(() {
                        _sendUpdates = value!;
                      });
                    },
                  ),

                  Padding(
                    padding: const EdgeInsets.only(left: 20,right: 20,top: 10),
                    child: Text("When I'm subscribe, I can opt out anytime by contacting Taxi Rider or via the link in the newsletter.",
                      style: GoogleFonts.roboto(
                        textStyle: TextStyle(
                          fontSize: 14,
                          color: Colors.grey,
                          fontWeight: FontWeight.w500,
                          decoration: TextDecoration.none,
                        ),
                      ),
                    ),
                  ),

                  GestureDetector(
                    onTap: (){
                      final isValidate = formKey.currentState!.validate();
                      if(isValidate){
                        Navigator.pushReplacement(context, MaterialPageRoute(builder: (context)=>HomePage(userEmail: emailControler.text,)));
                      }
                    },
                    child: Padding(
                      padding: EdgeInsets.all(10.0),
                      child: Align(
                        alignment: Alignment.bottomRight,
                        child: CircleAvatar(
                          backgroundColor: emailBorderColor,
                          radius: 25,
                          child: Icon(Icons.arrow_forward,color: Colors.white,size: 30,),
                        ),
                      ),
                    ),
                  ),

                ],
              ),
            ),
          ),

        ),
      ),
    );

  }
}
you can also Create one more page like HomePage.dart for submit email go to the Home Page.
import 'package:flutter/material.dart';
import 'package:google_fonts/google_fonts.dart';

class HomePage extends StatefulWidget {
  var userEmail;
  HomePage({Key? key,this.userEmail}) : super(key: key);


  @override
  State<HomePage> createState() => _HomePageState();
}

class _HomePageState extends State<HomePage> {
  @override
  Widget build(BuildContext context) {
    return Scaffold(
      appBar: AppBar(
        backgroundColor: Color(0xFFE91e63),
        centerTitle: true,
        title: Text("Home",style: GoogleFonts.nunitoSans(fontWeight: FontWeight.bold,fontSize: 18,color: Colors.white),),
      ),
      body: Center(
        child: Text(widget.userEmail,style: GoogleFonts.nunitoSans(fontSize: 30,color: Colors.black,fontWeight: FontWeight.bold),),
      ),
    );
  }
}
2. use emal_validator packages.
To archive this functionality you can use email_validator 2.1.17 package. this is very easy to use. we show the step how to implement and use it.
dependencies:
  email_validator: ^2.1.17
First you can go to the official page of this plugIn and read and understand. then open your pubspec.yaml file in your project and paste this code into the the file and click Pub get bottom in the top right.
and implement only this dependency and replace this code
import 'package:email_validator/email_validator.dart';

...

Form(
  autovalidate: true,
  child: TextFormField(
    validator: (value) => EmailValidator.validate(value) ? null : "Please enter a valid email",
  ),
)
In this code we also use Google Font package for text styling if you want the you can implement the package same as email_validation Package.
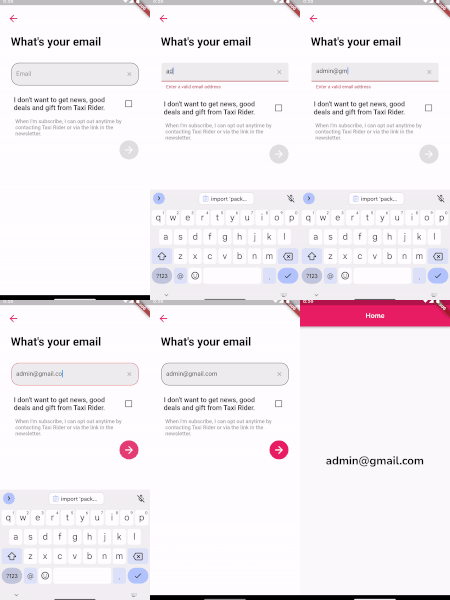
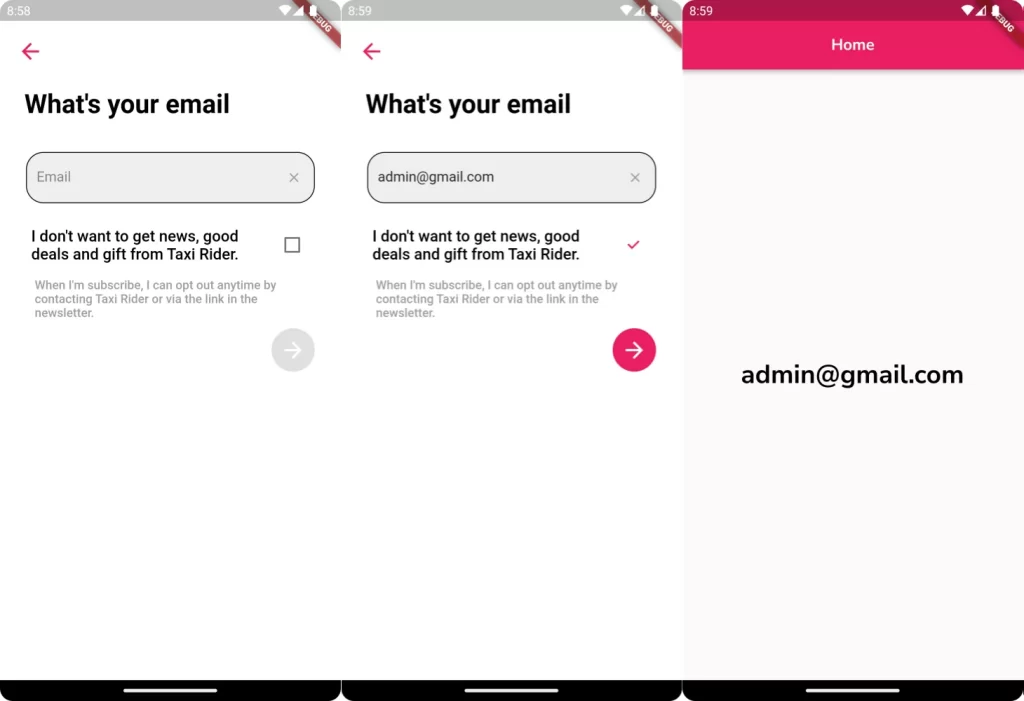
Output:

Conclusion :
In the above example, we create Email validation functionality in two type first by manual dynamic code, regex and email_validator package to validate the email address entered by the user. If the validator function returns an error message (a non-null value), it means the input is invalid, and the error message will be displayed below the TextFormField. If the validator function returns null, the input is considered valid.
❤️❤️ Thanks for reading this article ❤️❤️
If I got something wrong? Let me know in the comments. I would love to improve 🥰🥰🥰.
Clap 👏👏👏 If this article helps you.
if you like our work so please follow us on this Dosomthings
Our New and Attractive articles:
Save image to file in Flutter: How to download and save image to file in Flutter
Tinder swipe card: How to implement tinder swipe card in a flutter.
Time Delay in Flutter: How to Run Code After Time Delay in Flutter App.


