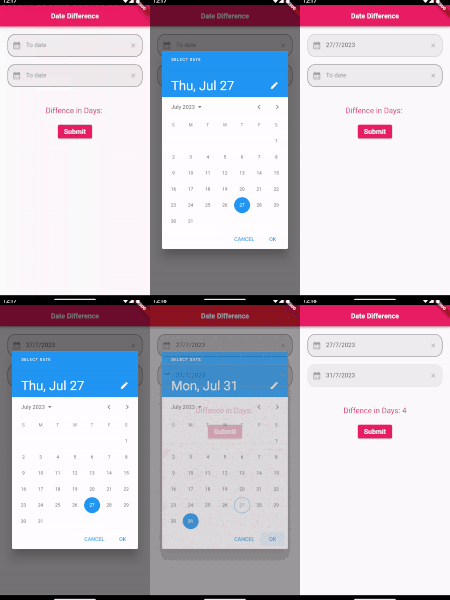
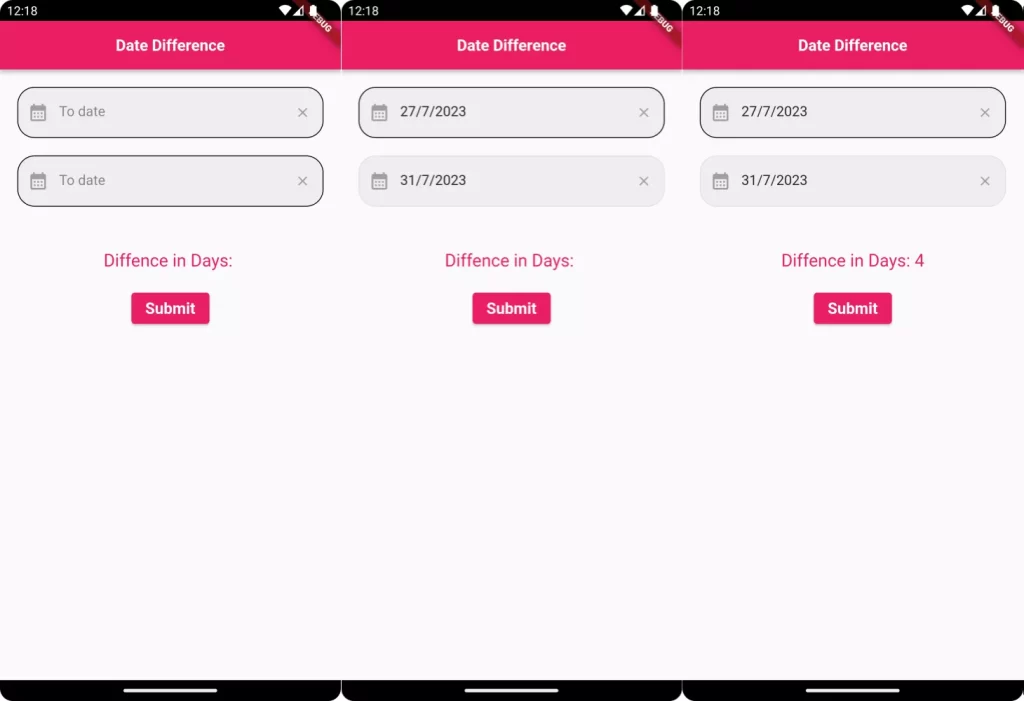
Hi guys I hope you are doing well, So in this article, we learn how to get days difference between two dates in Flutter and create a small and beautiful app. In this example, we are going to show you how to get the difference between two DateTime in days, hours, minutes, and seconds in Dart/Flutter. DateTime is an important component, you may need to calculate the difference between two DateTime.

Introduction:
In this blog post, we will explore how to calculate the difference between two DateTime objects in Flutter. This is a common requirement in many applications, such as tracking durations, age calculations, or event date comparisons. We will use the built-in Dart DateTime class and the Duration class for our calculations.
Prerequisites:
- Basic understanding of Dart programming language and Flutter framework.
- A Flutter development environment is set up on your machine.
Step 1: Create a new Flutter project:
Open your project in your favorite code editor (e.g., Visual Studio Code, Android Studio) and create a new project name “Date difference“.
Step 2: Set up the project:
Make sure you have the intl package installed. If not, add it to your pubspec.yaml file like this and click Pub get button top right corner.
dependencies:
  flutter:
    sdk: flutter
  intl: ^0.18.0
Run flutter pub get to install the dependencies.
Step 3: Import the required libraries
Open a main.dart file in and remove all code and import the necessary libraries in the top:
import 'package:flutter/material.dart';
import 'package:intl/intl.dart';
Step 4: Create a function to calculate the difference:
In the main.dart file, create a function to calculate the difference between two DateTime objects:
  int calculateDaysDifference(String fromdate, String todate) {
    DateFormat format = DateFormat("dd/MM/yyyy");
    DateTime fromDate = format.parse(fromdate);
    DateTime toDate = format.parse(todate);
    Duration difference = toDate.difference(fromDate);
    return difference.inDays;

    // you can also return in minutes,seconds,hours
    // return difference.inMinutes;
    // return difference.inSeconds;
    // return difference.inHours;

  }
This function takes two DateTime parameters, fromdate and todate, and returns an integer representing the difference in days between the two dates.
Step 5: Implement the UI and Full code:
this is the full code copy all code and paste it into your main.dart file.
import 'package:flutter/material.dart';
import 'package:intl/intl.dart';


void main() {
  runApp(const App());
}

class App extends StatefulWidget {
  const App({super.key});

  @override
  State<App> createState() => _AppState();
}

class _AppState extends State<App> {

  @override
  Widget build(BuildContext context) {


    return MaterialApp(
      title: "Date Difference",
      home: HomePage(),
    );
  }
}

class HomePage extends StatefulWidget {
  const HomePage({Key? key}) : super(key: key);

  @override
  State<HomePage> createState() => _HomePageState();
}

class _HomePageState extends State<HomePage> {


  final formKey = GlobalKey<FormState>();
  final toDateControler = TextEditingController();
  final fromDateControler = TextEditingController();
  Color formBorderColor = Colors.grey.shade300;
  String? _differenceDays ;


  int calculateDaysDifference(String fromdate, String todate) {
    DateFormat format = DateFormat("dd/MM/yyyy");
    DateTime fromDate = format.parse(fromdate);
    DateTime toDate = format.parse(todate);
    Duration difference = toDate.difference(fromDate);
    return difference.inDays;
  }


  @override
  Widget build(BuildContext context) {
    return SafeArea(
      child: Scaffold(
        appBar: AppBar(
          title: Text("Date Difference",style: TextStyle(fontSize: 18, fontWeight: FontWeight.bold,color: Colors.white),),
          backgroundColor: Color(0xFFe91e63),
          centerTitle: true,
        ),
        body: SingleChildScrollView(
          child: Padding(
            padding: EdgeInsets.all(20),
            child: Column(
              children: <Widget>[

                Form(
                  key: formKey,
                  child:  Column(
                    children: [

                      TextFormField(
                        onTap: () async {
                          DateTime? pickedDate = await showDatePicker(
                              context: context,
                              initialDate: DateTime.now(),
                              firstDate: DateTime(1950),
                              lastDate: DateTime(2050));

                          if (pickedDate != null) {
                            fromDateControler.text = '${pickedDate.day}/${pickedDate.month}/${pickedDate.year}';
                          }
                        },
                        readOnly: true,
                        autocorrect: false,
                        autovalidateMode: AutovalidateMode.onUserInteraction,
                        controller: fromDateControler,

                        decoration: InputDecoration(
                          suffixIcon: IconButton(
                            icon: Icon(Icons.close,color: Colors.grey,size: 18,),
                            onPressed: () => fromDateControler.clear(),
                          ),
                          prefixIcon: Icon(Icons.calendar_month,color: Colors.grey,),
                          enabledBorder: OutlineInputBorder(
                            borderRadius: BorderRadius.circular(20.0),
                          ),
                          hintText: 'To date',
                          hintStyle: TextStyle(fontSize: 16,color:Colors.black45),
                          fillColor: Colors.grey.shade200,
                          filled: true,
                          counterText: "",
                          focusedBorder:OutlineInputBorder(
                            borderSide: BorderSide(color: formBorderColor, width: 1.0),
                            borderRadius: BorderRadius.circular(20.0),
                          ),
                        ),
                        keyboardType: TextInputType.datetime,
                        textInputAction: TextInputAction.done,
                        validator: (value) => value!.isEmpty ? 'please give date' : null,
                        onChanged: (value){
                          setState(() {
                            if(value != null){
                              formBorderColor = Color(0xFFE91e63);

                            }
                            else{
                              formBorderColor = Colors.grey.shade300;
                            }

                          });
                        },


                      ),

                      SizedBox(height: 20,),

                      TextFormField(
                        onTap: () async {
                          DateTime? pickedDate = await showDatePicker(
                              context: context,
                              initialDate: DateTime.now(),
                              firstDate: DateTime(1950),
                              lastDate: DateTime(2050));

                          if (pickedDate != null) {
                            toDateControler.text = '${pickedDate.day}/${pickedDate.month}/${pickedDate.year}';
                          }
                        },
                        readOnly: true,
                        autocorrect: false,
                        autovalidateMode: AutovalidateMode.onUserInteraction,
                        controller: toDateControler,

                        decoration: InputDecoration(
                          suffixIcon: IconButton(
                            icon: Icon(Icons.close,color: Colors.grey,size: 18,),
                            onPressed: () => toDateControler.clear(),
                          ),
                          prefixIcon: Icon(Icons.calendar_month,color: Colors.grey,),
                          enabledBorder: OutlineInputBorder(
                            borderRadius: BorderRadius.circular(20.0),
                          ),
                          hintText: 'To date',
                          hintStyle: TextStyle(fontSize: 16,color:Colors.black45),
                          fillColor: Colors.grey.shade200,
                          filled: true,
                          counterText: "",
                          focusedBorder:OutlineInputBorder(
                            borderSide: BorderSide(color: formBorderColor, width: 1.0),
                            borderRadius: BorderRadius.circular(20.0),
                          ),
                        ),
                        keyboardType: TextInputType.datetime,
                        textInputAction: TextInputAction.done,
                        validator: (value) => value!.isEmpty ? 'please give date' : null,
                        onChanged: (value){
                          setState(() {
                            if(value != null){
                              formBorderColor = Color(0xFFE91e63);

                            }
                            else{
                              formBorderColor = Colors.grey.shade300;
                            }

                          });
                        },


                      ),

                    ],
                  ),
                ),
                SizedBox(height: 50,),
                Text("Diffence in Days: ${_differenceDays ?? ''}",style: TextStyle(fontSize: 20,color: Color(0xFFe91e63)),),
                SizedBox(height: 20,),
                ElevatedButton(
                  child: Text('Submit',style: TextStyle(fontSize: 18,fontWeight: FontWeight.bold,color: Colors.white),),
                  style: ElevatedButton.styleFrom(
                    primary: Color(0xFFe91e63),
                  ),
                  onPressed: () {
                    final isValidate = formKey.currentState!.validate();

                    if(isValidate){

                      setState(() {
                        int differenceInDays = calculateDaysDifference(fromDateControler.text, toDateControler.text);
                        _differenceDays = differenceInDays.toString();
                      });

                    }
                  },
                ),


              ],
            ),
          ),
        ),
      ),
    );
  }
}
Output

Conclusion:
In this blog post, we have learned how to calculate the difference between two DateTime objects in Flutter using the built-in Dart DateTime class and the Duration class. You can now use this knowledge to perform various date-related calculations in your Flutter applications. Happy coding!😀😀😀
❤️❤️ Thanks for reading this article ❤️❤️
If I got something wrong? Let me know in the comments. I would love to improve 🥰🥰🥰.
Clap 👏👏👏 If this article helps you.
if you like our work so please follow us on this Dosomthings
Our New and Attractive articles:
Save image to file in Flutter: How to download and save image to file in Flutter
Tinder swipe card: How to implement tinder swipe card in a flutter.
validate email in a TextFormField: How to validate email in a TextFormField .


