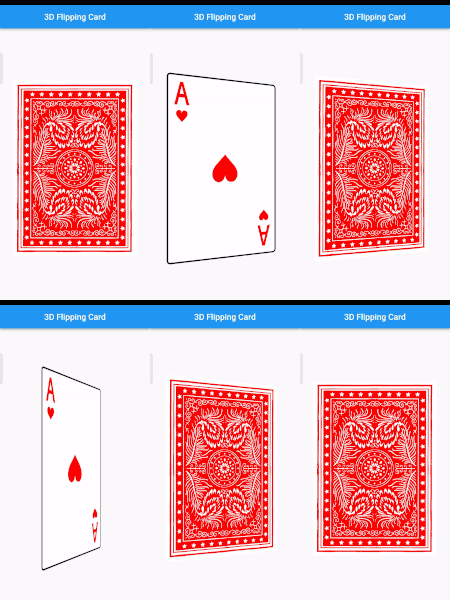
Hi, guys I hope you all are well so in this tutorial we create new and attractive rotate images by Drag Gesture. When I first saw the AnimationSwitcher widget, I thought in my mind that I would be able to flip a widget, revealing its rear side.
I was all wrong: the AnimationSwitcher allows you to… switch between several widgets, with an animation you define (the default animation is a fade transition). This component is too generic for that purpose.

I discovered a flutter package that may do that flip animation, named animated_card_switcher, but it seems to be not properly maintained, and the code is too complex.
Here is the development steps :
- Create the front and rear widgets
- Use the AnimationSwitcher widget to animate
- Code your custom transition builder to rotate your card
- Add curves
Create the front and rear widgets for rotate image
First, we crate RotateImages.dart class and crate FlipCardWidget() inside this define the images which you use for rotate like this
import 'package:flutter/material.dart';
import 'package:navigationdrawer/Rotate3D/flip_card_widget.dart';

class RotateImages extends StatefulWidget {
  const RotateImages({Key? key}) : super(key: key);

  @override
  State<RotateImages> createState() => _RotateImagesState();
}

class _RotateImagesState extends State<RotateImages> {
  @override
  Widget build(BuildContext context) {
    return Scaffold(
      appBar: AppBar(
        title: Text('3D Flipping Card'),
        centerTitle: true,
      ),
      body: Container(
          alignment: Alignment.center,
          padding: EdgeInsets.all(32),
          child: FlipCardWidget(
            front: Image.asset('assets/images/rotate_image1.jpg'),
            back: Image.asset('assets/images/rotate_image2.jpg'),
          )),
    );
  }
}
Crate FlipCardWidget for AnimationSwitcher and Curves
Now, we can use the AnimationSwitcher widget to animate the transition between the front and rear widgets.
In a Stateful widget, I override the build method to create a page that will show the animation in its center. you just add these lines of code and see animated effects on result.
import 'dart:math';
import 'package:flutter/material.dart';

class FlipCardWidget extends StatefulWidget {
  final Image front;
  final Image back;

  const FlipCardWidget({required this.front, required this.back, Key? key})
      : super(key: key);

  @override
  State<FlipCardWidget> createState() => _FlipCardWidgetState();
}

class _FlipCardWidgetState extends State<FlipCardWidget>
    with SingleTickerProviderStateMixin {
  late AnimationController controller;
  late Animation<double> animation;
  bool isFront = true;
  bool isFrontStart = true;
  double dragPosition = 0;

  @override
  void initState() {
    super.initState();
    controller = AnimationController(
      duration: const Duration(milliseconds: 500),
      vsync: this,
    );
    controller.addListener(() {
      setState(() {
        dragPosition = animation.value;
        setImageSide();
      });
    });
  }

  @override
  void dispose() {
    controller.dispose();
    super.dispose();
  }

  @override
  Widget build(BuildContext context) {
    final angle = dragPosition / 180 * pi;
    final transform = Matrix4.identity()
      ..setEntry(3, 2, 0.001)
      ..rotateY(angle);

    return GestureDetector(
      onHorizontalDragStart: ((details) {
        controller.stop();
        isFrontStart = isFront;
      }),
      onHorizontalDragUpdate: ((details) => setState(() {
            dragPosition -= details.delta.dx;
            dragPosition %= 360;
            setImageSide();
          })),
      onHorizontalDragEnd: ((details) {
        final velocity = details.velocity.pixelsPerSecond.dx.abs();

        if (velocity >= 100) {
          isFront = !isFrontStart;
        }

        double end = isFront ? (dragPosition > 180 ? 360 : 0) : 180;
        animation =
            Tween<double>(begin: dragPosition, end: end).animate(controller);

        controller.forward(from: 0);
      }),
      child: Transform(
          transform: transform,
          alignment: Alignment.center,
          child: isFront
              ? widget.front
              : Transform(
                  transform: Matrix4.identity()..rotateX(pi),
                  alignment: Alignment.center,
                  child: widget.back,
                )),
    );
  }

  void setImageSide() {
    if (dragPosition <= 90 || dragPosition >= 270) {
      isFront = true;
    } else {
      isFront = false;
    }
  }
}


Conclusion
As you can see, it is not a big deal: I made this animation with around 70-80 lines of code (animation only), using only one attribute (the displayed side of the widget).
So feel free to use my code. I’m not a fan of copy-paste, so I would say “appropriate my code”, meaning copy-paste it, understand it, and modify it to your needs!
if you like our work then explore my all work Click.
and if you are interested in new and attractive designs and layouts then Click.

