Stripe is one of the most secure and widely used payment gateways that allows businesses to accept online payments seamlessly. Integrating Stripe in a Flutter app with a Node.js backend ensures secure transactions, flexibility, and scalability. This guide will take you through the entire process step by step, explaining why each component is used and where it is applied.

By the end of this tutorial, you will be able to:
- Set up in a Flutter Stripe Payment app.
- Create a Node.js backend to handle payments.
- Accept online payments securely using the Stripe Payment Sheet.
Step 1: Set Up Stripe in Your Flutter App
1.1 Install Required Dependencies
Before we start coding, we need to install the necessary Flutter packages. Open your pubspec.yaml file and add the following dependencies:
flutter_stripe: click here.
http: click here.
lottie: click here.
dependencies:
  flutter:
    sdk: flutter
  flutter_stripe: ^10.0.0  # Stripe package to handle payments
  http: ^0.13.6  # For making API requests
  lottie: ^2.3.2  # For animations (optional)
Run the following command to install the packages:
flutter pub getWhy do we need these packages?
flutter_stripe: This package provides Stripe integration for handling payments in the Flutter app.http: Used to send requests to the Node.js backend to create payment intents.lottie: Optional, but useful for adding animations to enhance user experience.
1.2 Configure Stripe in Your Flutter App
In main.dart, initialize Stripe with your publishable key:
import 'package:flutter_stripe/flutter_stripe.dart';

void main() {
  WidgetsFlutterBinding.ensureInitialized();
  Stripe.publishableKey = "your_publishable_key"; // Replace with your actual key
  runApp(MyApp());
}
Why is this required?
Stripe requires a publishable key to identify your application and allow secure transactions. Without this, payments cannot be processed.
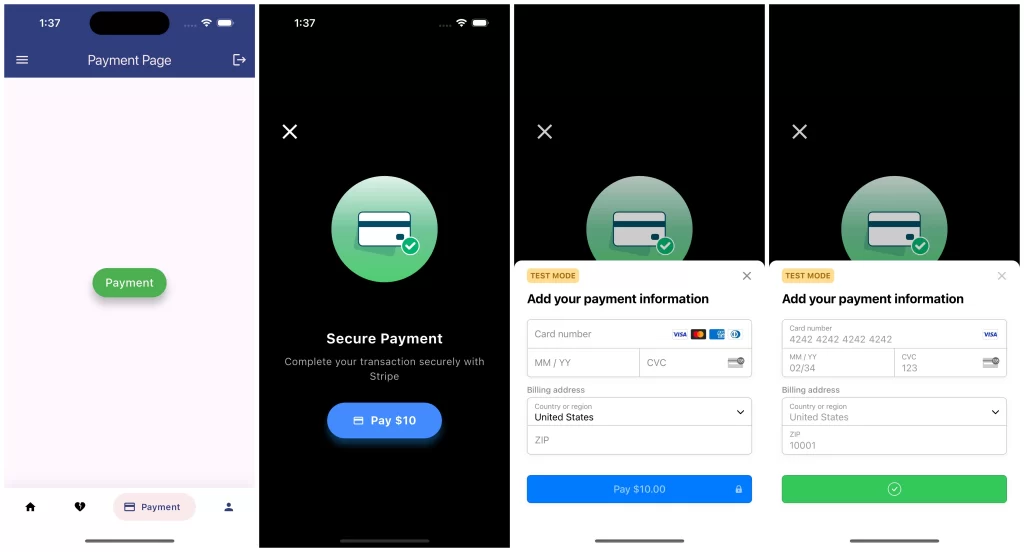
Step 2: Create a Payment UI in Flutter
A well-designed UI helps users make payments effortlessly. Below is the complete PaymentScreen widget.
import 'dart:convert';
import 'dart:ui';
import 'package:flutter/material.dart';
import 'package:flutter_stripe/flutter_stripe.dart';
import 'package:http/http.dart' as http;
import 'package:lottie/lottie.dart';

class PaymentScreen extends StatefulWidget {
  @override
  _PaymentScreenState createState() => _PaymentScreenState();
}

class _PaymentScreenState extends State<PaymentScreen> {
  Map<String, dynamic>? paymentIntent;

  Future<void> makePayment() async {
    try {
      // 1. Create a Payment Intent using the backend
      final response = await http.post(
        Uri.parse("http://localhost:3000/api/payments/create-payment-intent"),
        headers: {'Content-Type': 'application/json'},
        body: jsonEncode({"amount": 1000, "currency": "usd"}), // $10.00
      );

      final jsonResponse = jsonDecode(response.body);
      paymentIntent = jsonResponse;

      // 2. Initialize Payment Sheet
      await Stripe.instance.initPaymentSheet(
        paymentSheetParameters: SetupPaymentSheetParameters(
          paymentIntentClientSecret: paymentIntent!['clientSecret'],
          merchantDisplayName: "Your Company",
        ),
      );

      // 3. Display Payment Sheet
      await Stripe.instance.presentPaymentSheet();

      setState(() {
        paymentIntent = null;
      });

      ScaffoldMessenger.of(context).showSnackBar(
        SnackBar(content: Text("Payment Successful! 🎉")),
      );
    } catch (error) {
      ScaffoldMessenger.of(context).showSnackBar(
        SnackBar(
          content: Text("Payment Failed", style: TextStyle(fontSize: 12), textAlign: TextAlign.center),
          backgroundColor: Colors.red,
          duration: Duration(milliseconds: 300),
        ),
      );
    }
  }

  @override
  Widget build(BuildContext context) {
    return Scaffold(
      body: Center(
        child: ElevatedButton(
          onPressed: makePayment,
          child: Text("Pay \$10"),
        ),
      ),
    );
  }
}
Why is this required?
- This widget creates a simple UI for users to initiate a payment.
- Calls the makePayment() function to interact with Stripe via the backend.
- Displays a Payment Sheet to handle transactions securely.
Step 3: Set Up Node.js Backend for Stripe
3.1 Install Dependencies
In your Node.js project, install the required dependencies:
npm init -y
npm install express cors stripe dotenv body-parser
Why do we need these packages?
express: Framework to create a backend server.cors: Enables cross-origin requests.stripe: Allows interaction with the Stripe API.dotenv: Loads environment variables securely.body-parser: Parses incoming JSON requests.
3.2 Configure Stripe in <strong>server.js</strong>
Create a server.js file and add the following:
const express = require("express");
const Stripe = require("stripe");
const cors = require("cors");
require("dotenv").config();

const app = express();
app.use(cors());
app.use(express.json());

// Initialize Stripe with your secret key
const stripe = Stripe("your_secret_key");

// Create Payment Intent API
app.post("/api/payments/create-payment-intent", async (req, res) => {
  try {
    const { amount, currency } = req.body;
    const paymentIntent = await stripe.paymentIntents.create({
      amount: amount,
      currency: currency,
      payment_method_types: ["card"],
      description: "Online app payment for only testing",
            shipping: {
                  name: "Saurabh aswal", //
                   address: {
                        line1: "Nainital",
                        city: "Haldwani",
                        state: "Uttarakhand",
                        postal_code: "263139",
                        country: "IN",
                   },
               },
    });
    res.json({ clientSecret: paymentIntent.client_secret });
  } catch (error) {
    res.status(400).json({ error: error.message });
  }
});

app.listen(3000, () => console.log("Server running on port 3000"));
Why is this required?
- The backend securely creates Payment Intents to process transactions.
- It ensures that sensitive operations are not exposed to the client side.
Step 4: Run Your Flutter App and Backend
4.1 Start the Node.js Server
node server.js4.2 Run the Flutter App
flutter runConclusion
Congratulations! 🎉 You have successfully integrated Stripe Payment Gateway in a Flutter app with a Node.js backend. This ensures secure transactions, flexibility, and a seamless user experience. 🚀
Would you like to add features like saving transactions in Firebase or PostgreSQL? Let me know! 😊
If you are stuck and get some error then let me know I love to help you.
❤️ Stay Connected & Keep Learning!
Enjoyed this article? Share it with your fellow developers and let’s continue the conversation! 📌 Follow us for more Flutter insights 🚀
❤️❤️ Thanks for reading this article ❤️❤️
If I got something wrong? Let me know in the comments. I would love to improve 🥰🥰🥰.
Clap 👏👏👏 If this article helps you,
if you like our work, please follow us on this Dosomthings.
🔗 Related Articles:
Top Flutter Development Trends for 2025