In this article, we will explore the Hero widget in Flutter, one of the most powerful and visually appealing features for creating smooth transitions between two screens. By using the Hero widget, you can create animations where an element from one page animates to the next, giving your app a dynamic, engaging feel.
If you’re a developer building Flutter apps, learning how to implement the Hero widget can drastically improve your user experience. In this tutorial, I will guide you through creating a Hero animation using an example of Marvel superheroes, where a hero image transitions between two pages. You’ll also find the complete code at the end of the article.
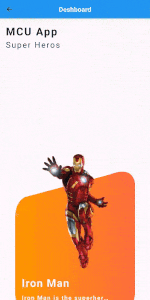
Table of Contents:
- What is the Hero Widget in Flutter?
- Setting Up Your Flutter Project
- Code Walkthrough: Creating a Dashboard with Hero Animation
- Running and Testing the App
What is the Hero Widget in Flutter?
The Hero widget in Flutter is used for creating seamless animations between two screens by “flying” a widget from one page to another. When you transition between routes, Flutter animates a shared widget (with the same Hero tag) between two different screens. This creates a smooth animation effect, making your app feel polished and responsive.
The widget is often used for images or icons, making them “fly” across the screen during route transitions. It’s particularly great for apps that emphasize visual design, like product showcases or hero profiles.
Setting Up Your Flutter Project
Before diving into the code, ensure you have Flutter installed and properly set up. You’ll need the following tools:
- Flutter SDK
- IDE (such as Visual Studio Code or Android Studio)
- A basic understanding of Flutter widgets
To get started, run the following command to create a new Flutter project:
flutter create hero_widget_demo
Once the project is created, navigate to the lib/ folder and create the following Dart files:
DeshBoardPage.dartHiroCard1.dartDetailesPage.dartBackgroundClipper.dart(for custom shapes)
Code Walkthrough: Creating a Dashboard with Hero Animation
DeshBoardPage.dart
In the DeshBoardPage.dart file, we create a dashboard showcasing different Marvel heroes. The PageView displays multiple superhero cards, which will animate to the next screen when clicked.
import 'package:flutter/material.dart';
import 'HeroCard1.dart';

class MCUui extends StatefulWidget {
  @override
  _MCUuiState createState() => _MCUuiState();
}

class _MCUuiState extends State<MCUui> {
  @override
  Widget build(BuildContext context) {
    return Scaffold(
      appBar: AppBar(
        title: Text('Dashboard'),
        backgroundColor: Colors.blue,
        centerTitle: true,
      ),
      body: Padding(
        padding: EdgeInsets.all(16.0),
        child: Column(
          crossAxisAlignment: CrossAxisAlignment.start,
          children: [
            Text("MCU Heroes", style: TextStyle(fontSize: 32, fontWeight: FontWeight.bold)),
            Expanded(
              child: PageView.builder(
                itemCount: 4,
                itemBuilder: (context, index) {
                  return HiroCard1(
                    gradient: _gradients[index],
                    imagePath: _images[index],
                    title: _titles[index],
                    subtitle: _subtitles[index],
                  );
                },
              ),
            ),
          ],
        ),
      ),
    );
  }

  final List<LinearGradient> _gradients = [
    LinearGradient(colors: [Colors.orange, Colors.deepOrangeAccent]),
    LinearGradient(colors: [Colors.blue, Colors.cyanAccent]),
    LinearGradient(colors: [Colors.red, Colors.pinkAccent]),
    LinearGradient(colors: [Colors.green, Colors.lightGreenAccent]),
  ];

  final List<String> _images = [
    'assets/images/iron_man.png',
    'assets/images/captaineamerica.png',
    'assets/images/captainemarvel.png',
    'assets/images/thor.png',
  ];

  final List<String> _titles = ['Iron Man', 'Captain America', 'Captain Marvel', 'Thor'];

  final List<String> _subtitles = [
    'The genius, billionaire Tony Stark.',
    'The World War II super soldier.',
    'The powerful cosmic hero, Carol Danvers.',
    'The Norse god of thunder.'
  ];
}
HeroCard1.dart
Each superhero card is a custom widget called HiroCard1. Inside this widget, we use the Hero widget to wrap around both the background and the image. This will ensure a smooth animation when navigating to the details page.
import 'package:flutter/material.dart';
import 'DetailesPage.dart';

class HiroCard1 extends StatelessWidget {
  final LinearGradient gradient;
  final String imagePath;
  final String title;
  final String subtitle;

  HiroCard1({
    required this.gradient,
    required this.imagePath,
    required this.title,
    required this.subtitle,
  });

  @override
  Widget build(BuildContext context) {
    return GestureDetector(
      onTap: () {
        Navigator.push(
          context,
          MaterialPageRoute(
            builder: (context) => DetailesPage(
              gradient: gradient,
              imagePath: imagePath,
              title: title,
              subtitle: subtitle,
            ),
          ),
        );
      },
      child: Stack(
        children: [
          Align(
            alignment: Alignment.bottomCenter,
            child: Hero(
              tag: 'background_$title',
              child: Container(
                width: MediaQuery.of(context).size.width * 0.8,
                height: MediaQuery.of(context).size.width * 0.8 * 1.33,
                decoration: BoxDecoration(gradient: gradient),
              ),
            ),
          ),
          Align(
            alignment: Alignment.center,
            child: Hero(
              tag: 'image_$title',
              child: Image.asset(imagePath, scale: 1.5),
            ),
          ),
        ],
      ),
    );
  }
}
DetailesPage.dart
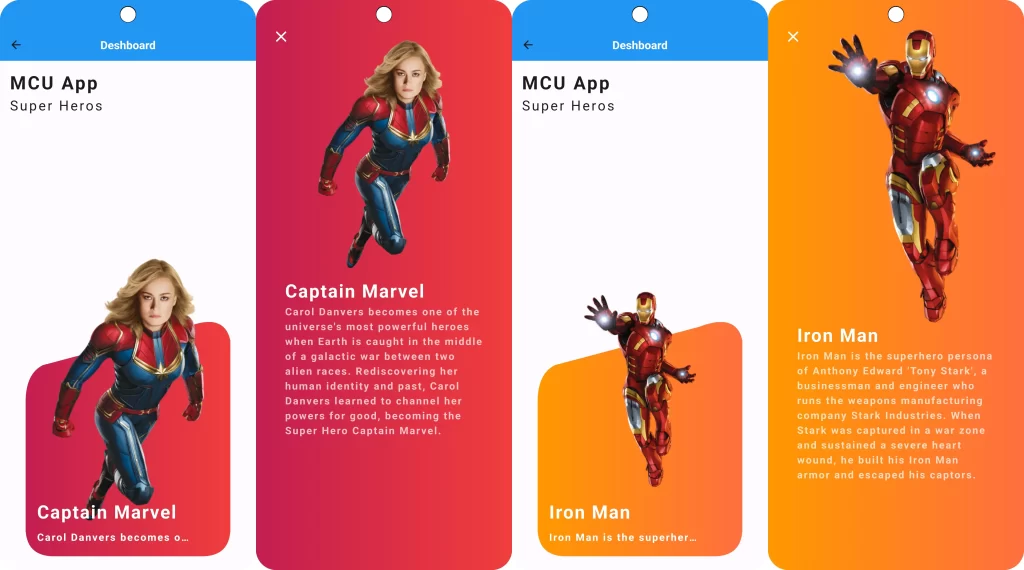
When a superhero card is clicked, the app navigates to a DetailesPage that shows more information about the superhero. The Hero animation is triggered for both the background and the image.
import 'package:flutter/material.dart';

class DetailesPage extends StatelessWidget {
  final LinearGradient gradient;
  final String imagePath;
  final String title;
  final String subtitle;

  DetailesPage({
    required this.gradient,
    required this.imagePath,
    required this.title,
    required this.subtitle,
  });

  @override
  Widget build(BuildContext context) {
    return Scaffold(
      body: Stack(
        fit: StackFit.expand,
        children: [
          Hero(
            tag: 'background_$title',
            child: Container(
              decoration: BoxDecoration(gradient: gradient),
            ),
          ),
          Padding(
            padding: EdgeInsets.symmetric(horizontal: 50, vertical: 50),
            child: Column(
              crossAxisAlignment: CrossAxisAlignment.start,
              children: [
                Hero(
                  tag: 'image_$title',
                  child: Image.asset(imagePath),
                ),
                Text(
                  title,
                  style: TextStyle(color: Colors.white, fontSize: 32, fontWeight: FontWeight.bold),
                ),
                Text(
                  subtitle,
                  style: TextStyle(color: Colors.white70, fontSize: 18),
                ),
              ],
            ),
          ),
          Positioned(
            top: 40,
            left: 20,
            child: IconButton(
              icon: Icon(Icons.close, color: Colors.white, size: 32),
              onPressed: () {
                Navigator.pop(context);
              },
            ),
          ),
        ],
      ),
    );
  }
}
4. Running and Testing the App
Now that we have everything set up, run your Flutter app using the following command:
flutter run
On clicking any superhero card, you’ll notice a smooth transition as both the background and image fly over to the detail page—showcasing the power of the Hero widget.
Output
Conclusion
This article covers everything from understanding the Hero widget to implementing it in a Flutter project, complete with a practical code example. Hopefully, it inspires you to create engaging, animated transitions in your own Flutter apps.
❤️❤️ Thanks for reading this article ❤️❤️
If I got something wrong? Let me know in the comments. I would love to improve 🥰🥰🥰.
Clap 👏👏👏 If this article helps you,
if you like our work, please follow us on this Dosomthings
Our more attractive articles:
Refresh in Flutter: How to implement Pull to Refresh in Flutter?
Date & Time in Flutter: How to Format Date and Time in Flutter
Spin and Win Wheel: How to create Spin and Win Wheel in Flutter