Ever wondered how those addictive Spin-and-Win games that keep users hooked are made? Imagine integrating such a dynamic and exciting feature into your app, giving your users the thrill of spinning and winning, all in a few taps! Well, guess what? With Flutter, creating a vibrant, fully functional spin wheel is easier than you think.
In today’s competitive app world, user engagement is everything. Adding interactive elements like a Spin-and-Win feature can not only elevate the user experience but also keep them coming back for more. Whether it’s for a rewards system or just a fun game mechanic, this tutorial will show you how to build it from scratch using Flutter!
In this step-by-step guide, we’ll walk you through everything you need to know to create a stunning and functional spin wheel. From designing the sectors to adding spinning logic, you’ll have a working wheel in no time!
“Ready to add some interactive magic to your Flutter app? Let’s dive in and spin the wheel!”
Step 1: Setting Up the Project
Before we dive into the code, ensure that you have set up your Flutter project and added the necessary dependencies. In this example, we are using google_fonts for styling text. You can add it to your pubspec.yaml:
dependencies:
  flutter:
    sdk: flutter
  google_fonts: ^2.1.0
Step 2: First, you create a new project and open your main.dart file and paste this code and create a new dart file name SpinTesting with StatefulWidget.
main.dart
import 'package:flutter/material.dart';
import 'SpinWin/spin.dart';

void main() {
  runApp(MyApp());
}

class MyApp extends StatelessWidget {
  @override
  Widget build(BuildContext context) {
    return MaterialApp(
      title: 'Spin & Win',
      theme: ThemeData(
        primarySwatch: Colors.blue,
      ),
      home: SpinTesting(),
    );
  }
}
Step 3: Animating the Wheel
We begin by creating a SpinTesting widget. This widget uses AnimationController and Tween to rotate the wheel.
class SpinTesting extends StatefulWidget {
  const SpinTesting({super.key});

  @override
  State<SpinTesting> createState() => _SpinTestingState();
}

class _SpinTestingState extends State<SpinTesting> with TickerProviderStateMixin {
  late AnimationController controller;
  late Animation<double> _animation;

  @override
  void initState() {
    _initializeAnimation();
    super.initState();
  }
Stateful Widget: We need a StatefulWidget because the wheel will animate, and the state will change during rotation.
TickerProviderStateMixin: Required to provide vsync for smooth animations.
AnimationController: This controls the duration and speed of the wheel’s spin.
Tween Animation: Defines the range of rotation. The wheel rotates for 5 full rotations in the initial setup.
The animation is initialized in the <strong><a href="https://api.flutter.dev/flutter/widgets/State/initState.html">initState</a></strong> method. Here, the AnimationController runs for 10 seconds, with the wheel spinning for 5 full rotations:
void _initializeAnimation() {
  controller = AnimationController(
    vsync: this,
    duration: Duration(seconds: 10), // Duration of the spin
  );
  _animation = Tween<double>(begin: 0.0, end: 2 * pi * 5) // 5 full rotations
      .animate(CurvedAnimation(parent: controller, curve: Curves.easeOut));

  controller.forward(); // Start the animation
}
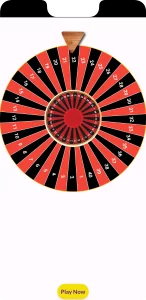
Step 4: Re-spinning the Wheel
We want users to be able to “Play Again” by pressing a button. When the button is clicked, the animation resets, and the wheel spins for 8 full rotations.
ElevatedButton(
  onPressed: () {
    controller.reset(); // Reset the animation
    controller.duration = Duration(seconds: 25); // New spin duration
    _animation = Tween<double>(begin: 0.0, end: 2 * pi * 8) // 8 full rotations
        .animate(CurvedAnimation(parent: controller, curve: Curves.easeOut));
    controller.forward(); // Start the re-spin
  },
  child: Text('Play Now'),
)
This is where we set a new duration and adjust the number of spins.
Step 5: Custom Drawing the Wheel
We use <strong><a href="https://api.flutter.dev/flutter/rendering/CustomPainter-class.html">CustomPainter</a></strong> to draw the wheel. This gives us control over how the segments of the wheel are rendered.
class SpinAndWinPainter extends CustomPainter {
  @override
  void paint(Canvas canvas, Size size) {
    final center = Offset(size.width / 2, size.height / 2); // Center of the circle
    final outerRadius = size.width / 2; // Outer radius of the wheel
    final innerRadius = outerRadius - 130; // Inner circle radius
Canvas and Paint: These are Flutter’s lower-level drawing tools. We specify the center and radius of the wheel and divide it into segments.
Segment Drawing: We use the drawArc method to draw each segment, alternating colors (red and black):
final segmentCount = 40; // Total segments
final sweepAngle = 2 * pi / segmentCount; // Angle for each segment

for (int i = 0; i < segmentCount; i++) {
  final startAngle = i * sweepAngle;
  final paint = Paint()..color = segmentColors[i % segmentColors.length];
  canvas.drawArc(
    Rect.fromCircle(center: center, radius: outerRadius),
    startAngle,
    sweepAngle,
    true,
    paint,
  );
}
Here, drawArc draws each segment with a sweep angle calculated by dividing the full circle by the number of segments.
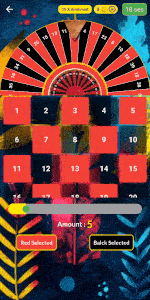
Step 6: Adding Numbers to the Wheel
Each segment of the wheel is numbered. To position the numbers in the middle of each segment, we use trigonometry:
for (int i = 0; i < numbers.length; i++) {
  final angle = (i + 0.5) * sweepAngle; // Position in the center of each segment
  final x = center.dx + (innerRadius + 90) * cos(angle); // X position
  final y = center.dy + (innerRadius + 90) * sin(angle); // Y position
The numbers are drawn using a TextPainter, allowing us to align and paint the text on the canvas.
Step 7: Rendering the Wheel
We then use an AnimatedBuilder to render the wheel on the screen, with its rotation handled by the _animation object.
AnimatedBuilder(
  animation: _animation,
  builder: (context, child) {
    final double angle = _animation.value; // Get current angle
    return Transform.rotate(
      angle: angle, // Rotate based on animation
      child: CustomPaint(
        size: Size(500, 500), // Size of the wheel
        painter: SpinAndWinPainter(),
      ),
    );
  },
)
Full code
import 'dart:math';
import 'dart:ui' as ui;
import 'package:flutter/material.dart';
import 'package:google_fonts/google_fonts.dart';

import '../AppColors/project_color.dart';

class SpinTesting extends StatefulWidget {
  const SpinTesting({super.key});

  @override
  State<SpinTesting> createState() => _SpinTestingState();
}

class _SpinTestingState extends State<SpinTesting> with TickerProviderStateMixin {
  late AnimationController controller;
  late Animation<double> _animation;

  @override
  void initState() {
    _initializeAnimation(); // Initialize animation when the widget is created
    super.initState();
  }


  void _initializeAnimation() {
    controller = AnimationController(
      vsync: this,
      duration: Duration(seconds: 10), // Initial duration of 10 seconds
    );

    // Tween for rotation (spins the wheel multiple times)
    _animation = Tween<double>(begin: 0.0, end: 2 * pi * 5) // 5 full rotations
        .animate(CurvedAnimation(parent: controller, curve: Curves.easeOut));

    controller.forward(); // Start the animation
  }

  @override
  void dispose() {
    controller.dispose(); // Dispose the controller when the widget is destroyed
    super.dispose();
  }

  @override
  Widget build(BuildContext context) {
    return SafeArea(
      child: Scaffold(
        bottomSheet: ElevatedButton(
          onPressed: () {
            controller.reset(); // Reset the animation
            controller.duration = Duration(seconds: 25); // Set new duration for the spin
            _animation = Tween<double>(begin: 0.0, end: 2 * pi * 8) // 8 full rotations for re-spin
                .animate(CurvedAnimation(parent: controller, curve: Curves.easeOut));
            controller.forward(); // Start the re-spin animation
          },
          child: Text(
            'Play Now',
            style: GoogleFonts.lato(fontSize: 16, fontWeight: FontWeight.bold, color: ProjectColors.textColor),
          ),
          style: ElevatedButton.styleFrom(
            padding: EdgeInsets.all(10),
            backgroundColor: Color(0xFFffe801),
            shape: RoundedRectangleBorder(
              borderRadius: BorderRadius.circular(40),
            ),
          ),
        ),
        body: Container(
          child: Stack(
            children: <Widget>[
              Positioned(
                child: Center(
                  child: Align(
                    alignment: Alignment.topCenter,
                    child: SizedBox(
                      height: 570,
                      width: 1000,
                      child: Stack(
                        alignment: Alignment.center,
                        clipBehavior: Clip.hardEdge,
                        children: [
                          Center(
                            child: AnimatedBuilder(
                              animation: _animation,
                              builder: (context, child) {
                                final double angle = _animation.value; // Get the current angle from animation
                                return Transform.rotate(
                                  angle: angle,
                                  child: CustomPaint(
                                    size: Size(500, 500), // Size of the wheel
                                    painter: SpinAndWinPainter(),
                                  ),
                                );
                              },
                            ),
                          ),
                          CircleAvatar(
                            radius: 80,
                            backgroundImage: AssetImage('assets/images/SpinWin/11111.png'),
                          ),
                        ],
                      ),
                    ),
                  ),
                ),
              ),
              Positioned(
                top: 30,
                child: SizedBox(
                  height: 80,
                  width: MediaQuery.of(context).size.width,
                  child: ClipRect(
                    child: Align(
                      alignment: Alignment.topCenter,
                      heightFactor: 0.5, // Display half the height of the image
                      child: Container(
                        alignment: Alignment.center,
                        child: SizedBox(
                          width: 90, // Larger width for the image to be scaled bigger
                          height: 100, // Larger height for the image to be scaled bigger
                          child: Image.asset(
                            'assets/images/SpinWin/arrowtesting.png',
                            fit: BoxFit.contain,
                          ),
                        ),
                      ),
                    ),
                  ),
                ),
              ),
            ],
          ),
        ),
      ),
    );
  }
}

class SpinAndWinPainter extends CustomPainter {
  @override
  void paint(Canvas canvas, Size size) {

    final center = Offset(size.width / 2, size.height / 2); // Center of the circle
    final outerRadius = size.width / 2; // Outer radius of the wheel
    final innerRadius = outerRadius - 130; // Inner circle radius
    final borderRadius = innerRadius + 5;

    // Colors for the segments (e.g., red, black)
    List<Color> segmentColors = [
      Colors.red, Colors.black,
    ];

    // Draw a gold border around the outer circle
    final goldBorderPaint = Paint()
      ..color = Colors.amber
      ..style = PaintingStyle.stroke
      ..strokeWidth = 3; // Adjust this for border thickness

    // Draw the gold border
    canvas.drawCircle(center, outerRadius, goldBorderPaint);

    // Paint the outer circle divided into segments
    final segmentCount = 40; // Number of segments
    final sweepAngle = 2 * pi / segmentCount; // Angle for each segment

    for (int i = 0; i < segmentCount; i++) {
      final startAngle = i * sweepAngle;
      final paint = Paint()..color = segmentColors[i % segmentColors.length];

      // Draw each segment as an arc
      canvas.drawArc(
        Rect.fromCircle(center: center, radius: outerRadius),
        startAngle,
        sweepAngle,
        true,
        paint,
      );
    }

    // Paint the inner circle at the center
    final innerPaint = Paint()
      ..color = Colors.amber
      ..style = PaintingStyle.fill;

    final innerPaint1 = Paint()
      ..color = Colors.red
      ..style = PaintingStyle.fill;

    canvas.drawCircle(center, borderRadius, innerPaint);
    canvas.drawCircle(center, innerRadius, innerPaint1);

    // Draw dividing lines
    final linePaint = Paint()
      ..color = Colors.white
      ..strokeWidth = 1;

    for (int i = 0; i < segmentCount; i++) {
      final angle = i * sweepAngle;
      final startX = center.dx + outerRadius * cos(angle);
      final startY = center.dy + outerRadius * sin(angle);
      final endX = center.dx + innerRadius * cos(angle);
      final endY = center.dy + innerRadius * sin(angle);
      canvas.drawLine(Offset(startX, startY), Offset(endX, endY), linePaint);
    }

    // Create a list of numbers for each segment
    List<int> numbers = List.generate(segmentCount, (index) => index + 1);


    final textPainter = TextPainter(
      textAlign: TextAlign.center,
      textDirection: ui.TextDirection.ltr,
    );

    // Draw the numbers inside the segments...
    for (int i = 0; i < numbers.length; i++) {
      final angle = (i + 0.5) * sweepAngle; // Position number in the middle of the segment
      final x = center.dx + (innerRadius + 90) * cos(angle); // Adjust the position
      final y = center.dy + (innerRadius + 90) * sin(angle);

      textPainter.text = TextSpan(
        text: '${numbers[i]}',
        style: TextStyle(
          color: Colors.white,
          fontSize: 14,
          fontWeight: FontWeight.bold,
        ),
      );

      textPainter.layout();
      textPainter.paint(canvas, Offset(x - textPainter.width / 2, y - textPainter.height / 2));
    }

  }

  @override
  bool shouldRepaint(CustomPainter oldDelegate) {
    return false; // No need to repaint for static content
  }
}
Output
Final Words
In this tutorial, we’ve walked through how to create a spin-and-win game wheel using Flutter’s animation and custom painting capabilities. With this setup, you can build interactive games that allow users to engage with a fun spinning wheel!
❤️❤️ Thanks for reading this article ❤️❤️
If I got something wrong? Let me know in the comments. I would love to improve 🥰🥰🥰.
Clap 👏👏👏 If this article helps you,
if you like our work, please follow us on this Dosomthings
Our more attractive articles:
Refresh in Flutter: How to implement Pull to Refresh in Flutter?
Date & Time in Flutter: How to Format Date and Time in Flutter
Image save in Flutter: How to download and save image to file in Flutter