Hi everyone, We hope that everyone is doing well and trying something new in your life 🥰🥰🥰. Now we learn about how to get the Date and Time in Flutter in a couple of simple steps. You don’t need to worry about getting the time and date after reading this article. So without wasting any time, we understand how to get them and why we need these values?
In Flutter, the DateTime object is a vital data type that developers frequently have to deal with. It is precise to within microseconds and depicts a particular moment in time. However, when it comes to user input or data from outside sources, we frequently come across date and time information as a string. This is where you need to use Flutter to convert the string to DateTime.
Step 1: First we want to get two packages from pub.dev. First is GoogleFont and other is intl.
First, open the pub.dev site and search google_fonts 6.2.1 and the copy the installation command like:
flutter pub add google_fontsand other package like intl 0.19.0 search into pub.dev site and copy also the installation command like:
dart pub add intlas well as open terminal and put and enter one by one like:
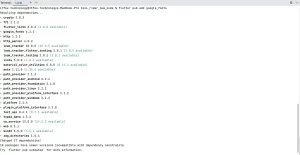
and the same install other package intl 0.19.0 also.
Step 2: Create a page where you want to show the design Create and the date value. In my case, I am creating a page name like WhenYouGoingDate. You can choose any name that fits your project. and put this code into it.
import 'package:flutter/material.dart';
import 'package:google_fonts/google_fonts.dart';
import '../HomePage.dart';
import 'package:intl/intl.dart';
import 'PickUpTimeStep4.dart';

class WhenYouGoingDate extends StatefulWidget {
  const WhenYouGoingDate({Key? key}) : super(key: key);

  @override
  State<WhenYouGoingDate> createState() => _WhenYouGoingDateState();
}

class _WhenYouGoingDateState extends State<WhenYouGoingDate> {


  DateTime _selectDate = DateTime.now();
  String formattedDate = DateFormat('dd MMM yyyy').format(DateTime.now());

  void _showDatePicker() {
    showDatePicker(
      context: context,
      firstDate: DateTime(2024),
      lastDate: DateTime(2025),
      initialDate: DateTime.now(),
    ).then((value) {
      if (value != null) {
        setState(() {
          _selectDate = value;
          formattedDate = DateFormat('dd MMM yyyy').format(value);
        });
      }
    });
  }

  @override
  Widget build(BuildContext context) {

    return SafeArea(
      child: Scaffold(
        body: Container(
          margin: EdgeInsets.only(left: 10,right: 10),
          width: double.infinity,
          color: Color(0xFFfffffe),
          padding: EdgeInsets.all(10.0),
          child: Column(
            children: <Widget>[


              SizedBox(height: 10),
              GestureDetector(
                onTap: (){
                  //in here if user click the back button then go to home page..
                  Navigator.pushReplacement(context, MaterialPageRoute(builder: (context)=>HomePage()));
                },
                child: Align(
                    alignment: Alignment.topLeft,
                    child: Icon(Icons.arrow_back,color: Colors.blue,size: 30,)),
              ),
              SizedBox(height: 10),
              Align(
                alignment: Alignment.topLeft,
                child: Text(
                  "When are you going?",
                  style: GoogleFonts.roboto(
                    fontSize: 30,
                    fontWeight: FontWeight.bold,
                    color: Colors.black,
                  ),
                ),
              ),
              SizedBox(height: 50,),
              ElevatedButton(
                  onPressed: _showDatePicker,
                  child: Container(
                    padding: EdgeInsets.all(10),
                    child: Row(
                      mainAxisAlignment: MainAxisAlignment.center,
                      children: <Widget>[
                        Icon(Icons.calendar_month,color: Colors.green,),
                        SizedBox(width: 5,),
                        Text("Select Date",
                          style: GoogleFonts.lato(
                            textStyle: TextStyle(color: Colors.black, letterSpacing: .5,fontWeight: FontWeight.bold),
                          ),
                        ),
                      ],
                    ),
                  )
              ),
              SizedBox(height: 30,),
              Text(
                "Date: $formattedDate",
                style: GoogleFonts.lato(
                  textStyle: TextStyle(
                    color: Colors.black38,
                    letterSpacing: .5,
                    fontSize: 18,
                    fontWeight: FontWeight.bold,
                  ),
                ),
              ),
              SizedBox(height: 30,),
              GestureDetector(
                  onTap: (){
                    setState(() {
                      if(_selectDate != ""){

                        //in here we send the user to next screen like pick up Time screen...
                        Navigator.pushReplacement(context, MaterialPageRoute(builder: (context)=>PickUpTime()));
                      }
                      else{
                        var snackBar = SnackBar(
                          content: Text('Please submit date!!', style: TextStyle(color: Colors.white,fontSize: 12,fontWeight: FontWeight.bold)),
                          backgroundColor: Colors.red,
                        );
                        ScaffoldMessenger.of(context).showSnackBar(snackBar);

                      }
                    });
                  },
                  child: Align(
                    alignment: Alignment.topRight,
                    child: CircleAvatar(
                      radius: 30,
                      backgroundColor: Colors.green,
                      child: Icon(Icons.arrow_forward,color: Colors.white,size: 30,),
                    ),
                  ),
                ),


            ],
          ),
        ),

      ),
    );
  }

}
Output:
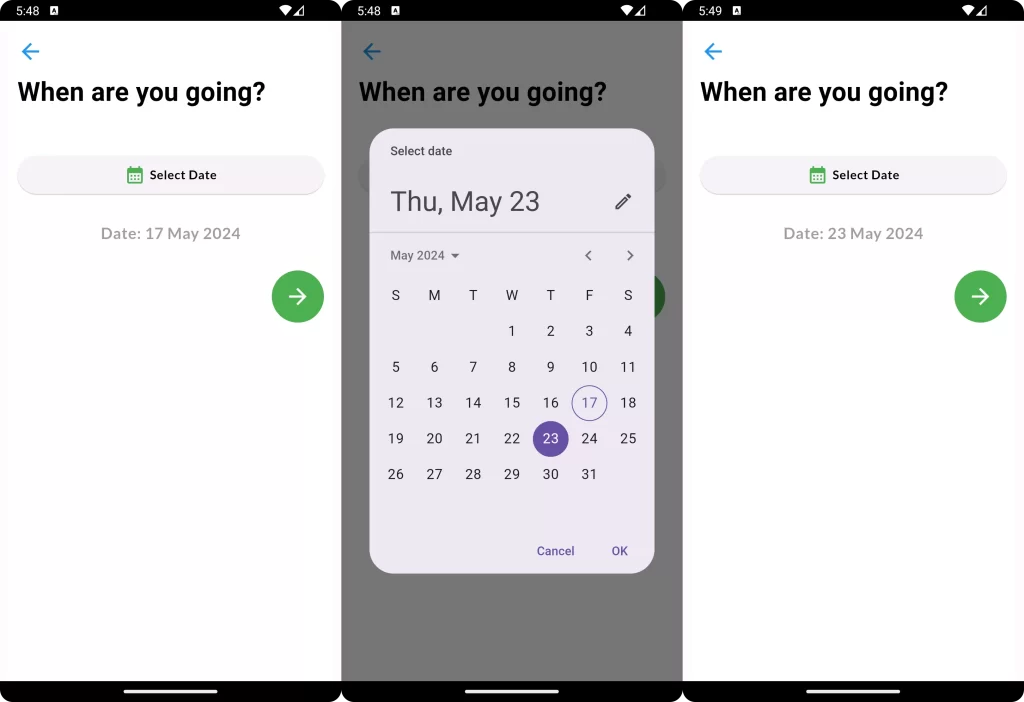
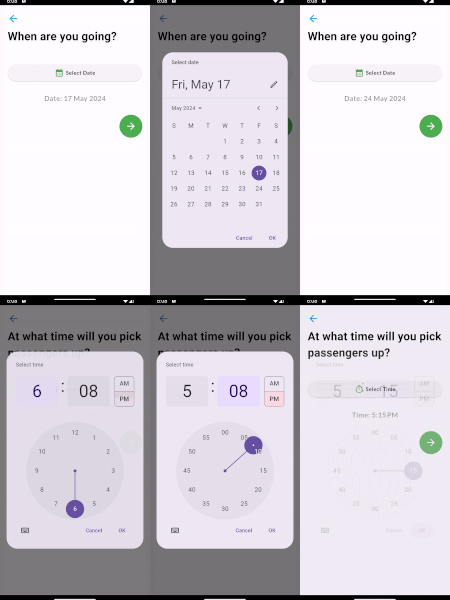
Step 3: Now it is time to get the time from the user. Now you can also create one more page. In my case, I am creating something like PickUpTime. You can choose any other name You want.
When you create the page, put this code into the page like this:
import 'package:flutter/material.dart';
import 'package:google_fonts/google_fonts.dart';
import 'package:intl/intl.dart';
import '../HomePage.dart';


class PickUpTime extends StatefulWidget {
  const PickUpTime({Key? key}) : super(key: key);

  @override
  State<PickUpTime> createState() => _PickUpTimeState();
}

class _PickUpTimeState extends State<PickUpTime> {

  DateTime? selectedTime = DateTime.now();


  @override
  Widget build(BuildContext context) {

    return SafeArea(
      child: Scaffold(
        body: Container(
          margin: EdgeInsets.only(left: 10,right: 10),
          width: double.infinity,
          color: Color(0xFFfffffe),
          padding: EdgeInsets.all(10.0),
          child: Column(
            children: <Widget>[


              SizedBox(height: 10),
              GestureDetector(
                onTap: (){
                  //In here when user click the back button then redirect into home page..
                  Navigator.pushReplacement(context, MaterialPageRoute(builder: (context)=>HomePage()));
                },
                child: Align(
                    alignment: Alignment.topLeft,
                    child: Icon(Icons.arrow_back,color: Colors.blue,size: 30,)),
              ),
              SizedBox(height: 10),
              Align(
                alignment: Alignment.topLeft,
                child: Text(
                  "At what time will you pick\npassengers up?",
                  style: GoogleFonts.roboto(
                    fontSize: 30,
                    fontWeight: FontWeight.bold,
                    color: Colors.black,
                  ),
                ),
              ),
              SizedBox(height: 50,),
              ElevatedButton(
                onPressed: () async {
                  final TimeOfDay? timeofday = await showTimePicker(
                    context: context,
                    initialTime: TimeOfDay.fromDateTime(selectedTime!),
                    initialEntryMode: TimePickerEntryMode.dial,
                  );
                  if (timeofday != null) {
                    setState(() {
                      // Convert TimeOfDay to DateTime
                      selectedTime = DateTime(
                        selectedTime!.year,
                        selectedTime!.month,
                        selectedTime!.day,
                        timeofday.hour,
                        timeofday.minute,
                      );
                    });
                  }
                },
                child: Container(
                  padding: EdgeInsets.all(10),
                  child: Row(
                    mainAxisAlignment: MainAxisAlignment.center,
                    children: <Widget>[
                      Icon(Icons.timer_sharp, color: Colors.green),
                      SizedBox(width: 5),
                      Text(
                        "Select Time",
                        style: GoogleFonts.lato(
                          textStyle: TextStyle(
                            color: Colors.black,
                            letterSpacing: .5,
                            fontWeight: FontWeight.bold,
                          ),
                        ),
                      ),
                    ],
                  ),
                ),
              ),
              SizedBox(height: 30,),
              Text(
                "Time: ${DateFormat.jm().format(selectedTime!)}",
                style: GoogleFonts.lato(
                  textStyle: TextStyle(
                    color: Colors.black38,
                    letterSpacing: .5,
                    fontSize: 18,
                    fontWeight: FontWeight.bold,
                  ),
                ),
              ),
              SizedBox(height: 30,),
              GestureDetector(
                onTap: (){
                  setState(() {
                    if(selectedTime != ""){

                      //In here when we get the user selected time then forword user to other screen..


                    }
                    else{
                      var snackBar = SnackBar(
                        content: Text('Please submit date!!', style: TextStyle(color: Colors.white,fontSize: 12,fontWeight: FontWeight.bold)),
                        backgroundColor: Colors.red,
                      );
                      ScaffoldMessenger.of(context).showSnackBar(snackBar);

                    }
                  });
                },
                child: Align(
                  alignment: Alignment.topRight,
                  child: CircleAvatar(
                    radius: 30,
                    backgroundColor: Colors.green,
                    child: Icon(Icons.arrow_forward,color: Colors.white,size: 30,),
                  ),
                ),
              ),


            ],
          ),
        ),

      ),
    );

  }
}
OutPut:
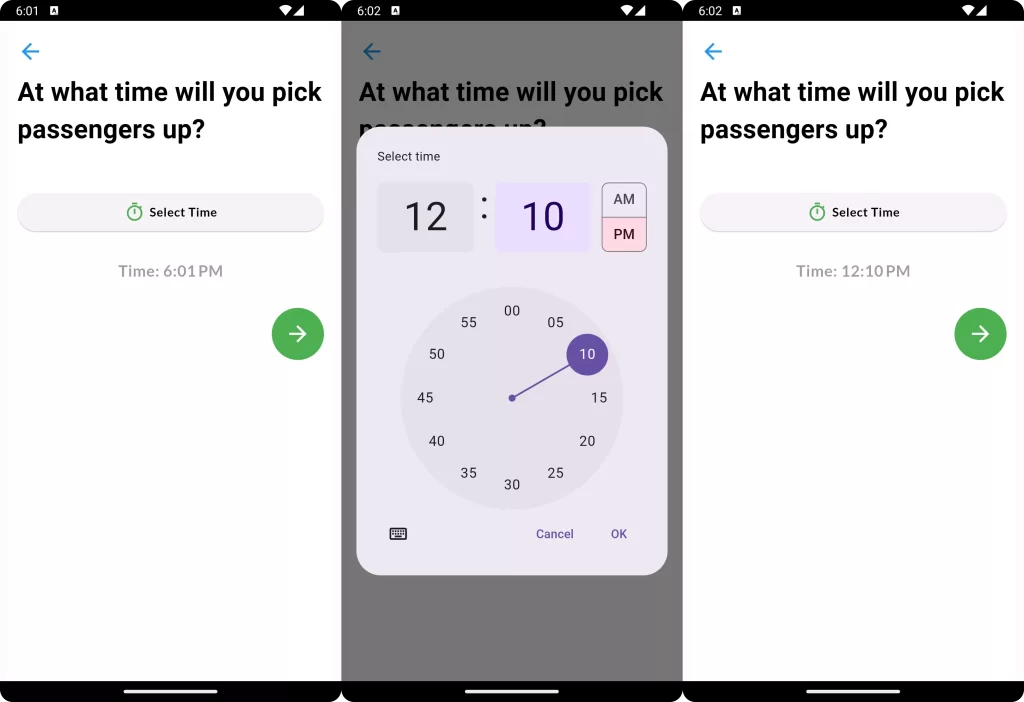
Conclusion: In conclusion, managing date and time data in Flutter requires converting a string to a DateTime object. It entails being aware of DateTime’s format and the structure of strings that can be converted. The key to receiving strings in the format ‘yyyy mm dd’ and producing a DateTime instance is the static DateTime parse function. To guarantee seamless and effective data processing, it is imperative to address potential conversion problems, such as incorrect date formats. You can efficiently handle string-to-DateTime conversions in Flutter using these insights.
Tips to Avoid Common Mistakes in Conversion:
A few common mistakes exist when converting strings to DateTime objects in Flutter. Here are some tips to avoid them:
- Ensure Correct String Format: The string should be in the ‘yyyy mm dd’ format. If it’s not, the DateTime parse method will throw FormatException.
- Handle Errors: Use a try-catch block to handle potential errors during conversion. This can prevent your application from crashing due to unhandled exceptions.
- Consider Time Zone Offset: If the string includes a time zone offset, ensure it’s valid. An invalid offset can result in incorrect DateTime objects.
- Use Libraries for Complex Formats: If the string format is complex or unconventional, consider using external libraries like (https://pub.dev/packages/intl%3E) for conversion. These libraries provide more flexibility and efficiency.
❤️❤️ Thanks for reading this article, ❤️❤️
If I got something wrong? Let me know in the comments. I would love to improve 🥰🥰🥰.
Clap 👏👏👏 If this article helps you.
If you like our work, please follow us on this Dosomthings.

